Umezaka-kun 160k Help Table of Contents
About This Help
This is the online help for Umezaka-kun 160k.
● Differentiating Highlight Colors
・Orange … Important sections.
・Red … Important sections. Denotes caution or prohibition.
・Green … Not extremely important, but intuitively hard to understand sections.
● About Screenshots
All screenshots are taken with version 1.00.
They may differ from the latest version’s screen.
Game Overview
This is a baseball game starring a single pitcher.
You train the protagonist “Umezaka-kun,” who belongs to the Red Caps, and aim for the league championship.
In the world of Umezaka-kun 160k, there are two leagues: “League 1” and “League 2” (Division 1 and Division 2).
Both leagues compete for the championship with a total of 5 teams, including the Red Caps.
You start in League 2 and get promoted to League 1 if you win the championship.
Conversely, if you finish last in League 1, you will be relegated to League 2.
Your abilities will not decline with age, and you can train for any number of years, so please rest assured.
How to Play
Operate with the mouse.
All yellow buttons are clickable.
Right-click and mouse wheel are not assigned any functions.
Press Esc key to exit the game.
Protagonist Stats
Explains the protagonist’s stats.
Abilities other than Form may slightly increase by winning games or earning titles.
● Stamina
The higher your stamina, the less your pitch quality will drop even with a high pitch count.
Stamina decreases with each pitch, and when it drops below half of your stamina before the game, other abilities will also start to decline.
● Speed
Greatly affects pitch speed.
The higher your speed, the easier it is to throw strikes and the harder it is to get hit.
However, if “Break” is low, it’s hard to get strikeouts (batters easily foul off pitches).
※Values over 201 in the training part are mostly not reflected in the game.
For example, even if you have 300 in the training part, it will only be about 190-230 in the game.
● Break
The higher your break, the easier it is to get strikeouts.
When you get a strikeout, for some reason your team’s batting lineup becomes energized, slightly increasing the probability of scoring runs and making it easier for your team to win.
Slightly affects pitch speed as well.
※Values over 201 in the training part are mostly not reflected in the game.
For example, even if you have 300 in the training part, it will only be about 190-230 in the game.
● Power
The higher your power, the less likely you are to give up extra-base hits.
Also, even if the ball is hit, the probability of getting an out on a ground ball increases.
Slightly affects pitch speed as well.
※Values over 201 in the training part are mostly not reflected in the game.
For example, even if you have 300 in the training part, it will only be about 190-230 in the game.
● Control
The higher your control, the more dots will be placed even at positions other than the mouse pointer, making it easier to draw lines.
● Trust
Becomes the initial value of the substitution gauge.
● Form 1 / Form 2
Form refers to your pitching form.
Your form subtly changes weekly (specifically, -5 to +5).
Also, selecting the blue-framed command in the training part allows you to correct your form.
There are two types of forms: “Form 1” and “Form 2”.
This means there are two important points in your pitching form.
○ Form 1: Break ⇔ Power
In Form 1, either “Break” or “Power” ability increases.
The value range is “Break +100%” to “Power +100%”, and if “Break” or “Power” drops below 0%, it doesn’t go negative, but instead the other ability increases.
※If “Break” or “Power” exceeds +50%, your pitching form will break down, preventing you from performing at your true potential in games.
Even if “Break” is set to +51% or higher, “Break” doesn’t actually increase much, and “Power” instead decreases.
Even if “Power” is set to +51% or higher, “Power” doesn’t actually increase much, and “Break” instead decreases.
This state is called “losing form balance” (let’s say).
When your form breaks, the form items in the training part are displayed in red.
Also, if you practice while your form is broken, your abilities will be harder to raise.
The ideal value for Form 1 can be said to be “Break +50%” or “Power +50%.”
○ Form 2: MAX Priority ⇔ Stability Priority
Form 2 determines how much pitch quality (speed, break, power) drops relative to release time (time from “Start” to “Release”).
The value range is “MAX Priority 100” to “Stability Priority 100”, and if “MAX Priority” or “Stability Priority” drops below 0, it doesn’t go negative, but instead the other increases.
The more “MAX Priority” you have, the easier it is to achieve maximum pitch quality (MAX speed), but pitch quality drops significantly if release takes a long time.
The more “Stability Priority” you have, the harder it is to achieve maximum pitch quality (MAX speed), but pitch quality doesn’t drop as much even if release takes a long time.
Roughly, if the release time is 1.5 seconds, “MAX Priority” and “Stability Priority” will have equivalent pitch quality.
If the release time is shorter than 1.5 seconds, “MAX Priority” is more advantageous; if longer, “Stability Priority” is more advantageous.
It’s probably safest to go with “Stability Priority” when you’re not used to the controls.
※If “MAX Priority” or “Stability Priority” exceeds 50, your pitching form will break down, preventing you from performing at your true potential in games.
Even if “MAX Priority” is set to +51% or higher, maximum pitch quality (MAX speed) doesn’t actually come out much, and pitch quality drops drastically if release takes a long time.
Even if “Stability Priority” is set to +51% or higher, maximum pitch quality (MAX speed) becomes extremely difficult to achieve, and pitch quality drops significantly (despite being stability-oriented) even if release takes a long time.
This state is called “losing form balance” (let’s say).
When your form breaks, the form items in the training part are displayed in red.
Also, if you practice while your form is broken, your abilities will be harder to raise.
The ideal value for Form 2, if you’re confident in your pitching controls, can be said to be “MAX Priority 50.”
However, if you’re not confident in your pitching controls, or if your pitching style focuses on precisely targeting courses, “Stability Priority 50” might be more advantageous.
If you can’t decide which is right for you, you can set it to “0.”
Opponent Stats
Explains opponent (batter) stats.
● Contact
The higher this is, the easier it is for the batter to make contact with the ball and get a hit.
● Long Ball Power
The higher this is, the more likely the batter is to hit extra-base hits.
● Persistence
The higher this is, the harder it is to get strikeouts (batters are more likely to foul off pitches when pressured).
Training Part
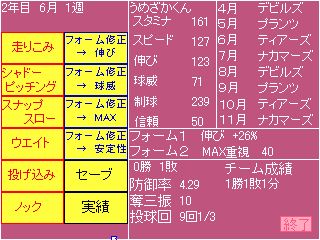
The top right of the screen shows the league game schedule.
Eight games are played each year, one at the beginning of each month from April to November.
The left side of the screen is the menu.
Click any command (practice) from the menu to train the protagonist.
Each command is explained below.
● Running
Increases “Stamina.”
Executing this command advances one week.
● Shadow Pitching
Increases “Speed.”
Executing this command advances one week.
● Snap Throw
Increases “Break.”
Executing this command advances one week.
● Weight Training
Increases “Power.”
Executing this command advances one week.
● Pitching Practice
Increases “Control.”
Executing this command advances one week.
● Fielding Practice
Increases “Trust.”
Executing this command advances one week.
● Form Correction → Break
Corrects “Form 1” by about 15% in the “Break” direction.
Executing this command advances one week.
● Form Correction → Power
Corrects “Form 1” by about 15% in the “Power” direction.
Executing this command advances one week.
● Form Correction → MAX
Corrects “Form 2” by about 15 in the “MAX Priority” direction.
Executing this command advances one week.
● Form Correction → Stability
Corrects “Form 2” by about 15 in the “Stability Priority” direction.
Executing this command advances one week.
● Save
Saves the current state.
● Records
You can view past records.
”★” indicates a title. For example, if ”★” is next to ERA, you earned “Best ERA” that year.
”Strikeout Record in one game” only remains for League 1 records.
● Exit (Command in bottom right of screen)
Exits the game.
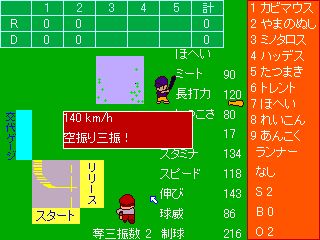
Match Part
● Rules
Basically, the rules are the same as in real baseball.
However, there are a few special rules and specifications.
・Baseball usually has 9 innings, but in this game, the winner is decided in 5 innings.
・If both teams have the same score after 5 innings, it’s a draw.
・The Red Caps, Umezaka-kun’s team, always bat first.
・There are no concepts of sacrifice bunts, sacrifice flies, hit by pitch, errors, double plays, stolen bases, balks, etc.
・Runners only advance by the number of bases hit by the batter. For example, even if a single hit is made with a runner on 2nd base, it will always be 1st and 3rd base, and no run will score.
● Ally’s Attack
Ally’s attacks are concisely conveyed through messages.
The higher the number of strikeouts, the higher the allies’ scoring rate.
● Umezaka-kun’s Pitching and Substitution
Umezaka-kun always starts as the starting pitcher.
The substitution gauge on the left of the screen decreases as the number of pitches increases, or as he gets hit or gives up runs. When it’s completely depleted, he’s substituted.
The timing of the substitution gauge’s increase/decrease is as follows:
○ When substitution gauge decreases
・Throws one pitch. Decreases significantly when stamina is below half.
・Gets hit. Decreases significantly if the inning is 4th or later.
・Issues a walk. Decreases significantly if the inning is 4th or later.
・Gives up a run.
○ When substitution gauge increases
・Gets an out. If it’s a strikeout, it increases 2.5 times more than a normal out.
In League 2, you might win the championship even without much success, thanks to batting support or strong relief pitching. But in League 1, you’ll almost certainly not win unless you perform exceptionally as the ace pitcher.
● Abilities in Game
Umezaka-kun’s stats in the game will be slightly different from the stats displayed in the training part.
This means his condition changes with each game.
※For “Speed,” “Break,” and “Power” stats in the training part, values above 201 are mostly not reflected in the game.
For example, even if “Speed” is 300 in the training part, it will only be about 190-230 in the game.
● How to Pitch

**① Click the “Start” button in the bottom left of the screen.
② Draw a vertical line in the gray square above “Start”.
③ Move the mouse pointer above the gray square.
④ Draw a horizontal line in the gray square.
⑤ Click the “Release” button.
If the vertical and horizontal lines overlap by exactly 1 dot, the pitch will be thrown to that dot with no error.
If the vertical and horizontal lines overlap by 2 dots, the pitch will be thrown to a different strike zone than intended.
If the vertical and horizontal lines do not overlap by even 1 dot, or overlap by 3 or more dots, the pitch will be outside the strike zone.
The longer the time taken from ① to ⑤, the more pitch quality (speed, break, power) decreases.
**
● Effect of Course
・The more you throw inside or outside, the easier it is to get ground balls. It doesn’t mean it’s easier to get swings and misses.
 ←Red zone is easier to hit. Yellow zone is harder to hit.
・Pitches high in the zone are more likely to result in extra-base hits, while pitches low in the zone are less likely to result in extra-base hits. An awkward height is scarier than being high and inside…
 ←Red zone is more likely to result in extra-base hits. Yellow zone is less likely to result in extra-base hits.
・Throwing to a course you’ve previously thrown to makes it easier to get hit. Courses you’ve thrown to before are displayed in green in the batter’s strike zone, so be sure to check before throwing. If you throw there, the dot indicating the thrown course will turn red. It’s still harder to get hit by throwing to the center than by throwing to a previously used course.
The general strategy is:
・Aim low against batters with long ball power.
・When in a pinch and you can’t give up another run, inside high for right-handed batters is best (shortest distance to release).
・To avoid struggling with courses later (not throwing to the same course), it’s also effective to intentionally throw near the center with two outs and no runners on, or against the bottom of the order.
About Records
There are 5 types of individual records: wins, losses, ERA, strikeouts, and innings pitched.
The conditions for increasing wins and losses, and the ERA calculation formula are slightly different from real professional baseball.
● Conditions for becoming a winning pitcher (conditions for increasing wins)
- Pitches 3 or more innings.
- The team is winning when substituted.
- The team ultimately wins.
● Conditions for becoming a losing pitcher (conditions for increasing losses)
- The team is losing when substituted.
- The team ultimately loses.
● ERA Calculation Formula
”ERA = Earned Runs × 5 ÷ Innings Pitched.”
Real professional baseball plays 9 innings, but in this game it’s 5 innings, hence ”× 5.”
This results in a lower ERA than real professional baseball for the same earned run rate.
Other
● Data Modification
Actually, you can change the protagonist’s and enemy teams’ data by editing the text files “Team0~10.txt” in the “data” folder.
Simple explanations are provided within each file.
However, the method of editing and the behavior after data editing are not supported (please do not ask questions about them on the BBS or elsewhere).