Event Actions Table of Contents
- Overview
- Message
- Picture
- Wait
- Move Map Cursor
- Warp
- Manipulate Enemy Group
- Copy Enemy
- Place Ally
- Change Initial Position
- Manipulate Event Variable
- Manipulate Common Variable
- Change Map Chip
- Change Event Graphic
- Play Sound Effect
- Change BGM
- Manipulate Status
- Manipulate Gold
- Learn Skill
- Manipulate Stock
- Add Goods
- Randomly Acquire Skill
- Change Ally Shop
- Change Party
- Clear Stage
- Game Over
Overview
Event Data Window
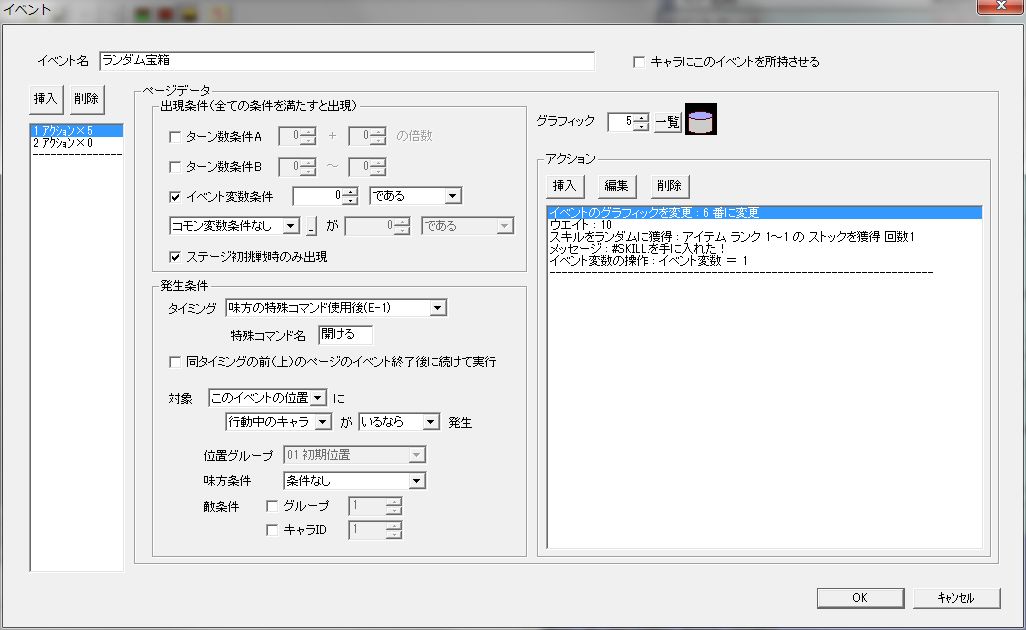
Event actions are the contents of an event’s execution.
When an event’s “Appearance Condition” and “Occurrence Condition” are met and the “Timing” comes, actions are executed in order from the top of the action list.
The following sections explain each action.
Message
“Message” Window
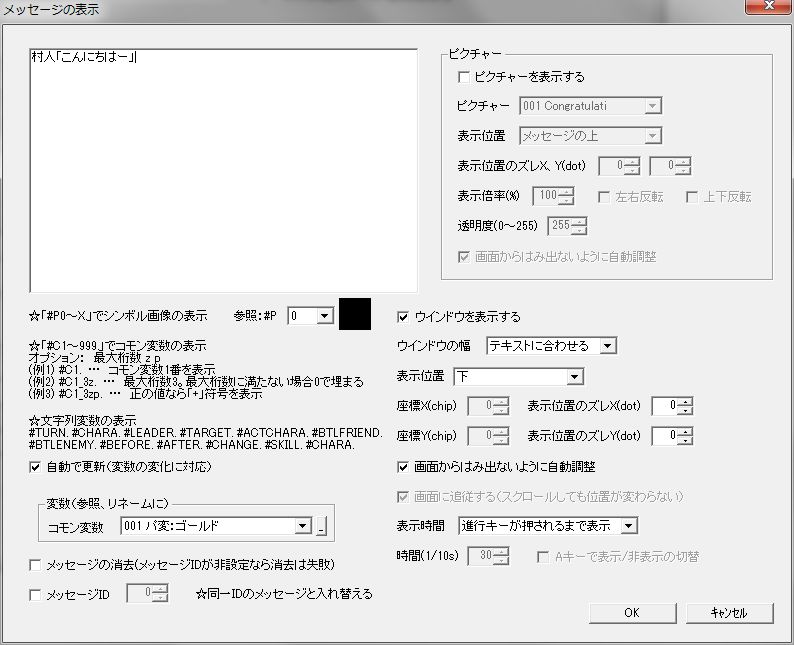
Displays text messages.
You can also display pictures (images) simultaneously with messages.
Please enter your message in the large text box at the top left of the window.
Below the message text box is an explanation of special characters.
All special characters should be entered in half-width.
For example, entering “#P5.” will display symbol graphic number 5 in the game.
Basically, it will display correctly even without the final ”.” (period), but in exceptional cases, special characters may fail to be recognized, so please include the ”.” if possible.
You can also display string variables that are stored when certain actions are executed.
Explanation of setting items.
● Auto Update (Responds to variable changes)
Whether variable value changes are immediately reflected in the message.
Enabling this will make it slightly heavier, but I don’t think it will be particularly noticeable as long as the variable’s value in the message doesn’t change, as the drawing content will not be updated.
● Clear Message
Clears the message with the specified Message ID.
If no ID is set, clearing fails.
● Message ID
Replaces the message with the specified Message ID with the current message.
Setting a Message ID here allows you to replace or clear messages at any time.
When executing the message action, the program first searches for and clears the message with the specified Message ID from the stage, and then displays the new message.
● Display Window
Whether to display the message window.
● Window Width
The width of the message window.
● Display Position
The display position of the message.
・Specify by screen coordinates … Specify by screen coordinates. The top-left of the game screen is (0,0).
・Specify by stage coordinates … Specify by stage coordinates. The top-left of the stage is (0,0).
・Other (“Center” ~ “Top Right”) … Specify a general position. The display position is automatically adjusted based on the number of characters and lines in the message text.
● Coordinate X (chip)
● Coordinate Y (chip)
Coordinates when “Display Position” is “Specify by Screen Coordinates” or “Specify by Stage Coordinates”.
● Display Position Offset X (dot)
● Display Position Offset Y (dot)
Here you can fine-tune the message’s display position in dot units.
● Auto-adjust to stay within screen
Whether to adjust and display the message, specified by “Display Position”, to just barely stay within the screen if it overflows.
● Follow screen
When displaying messages that do not pause the entire game, whether the message follows the screen (whether the message’s screen coordinates change with stage scrolling).
● Display Time
The display time of the message.
Display until advance key is pressed … Displays until the message advance key (usually Z key) is pressed. The entire game pauses until the message advance key is pressed.
Display until stage ends … Displays until the stage ends.
Specify by time … Displays until “Time” elapses.
● Time (1/10s)
The message display time when “Display Time” is “Specify by Time”.
● Toggle display/hide with A key
Whether to toggle message display/hide with the A key.
This also toggles the display/hide of the terrain effect information window at the bottom of the screen, so it serves a dual purpose.
Can be set if “Display Time” is “Display until stage ends”.
Picture
“Picture” Window
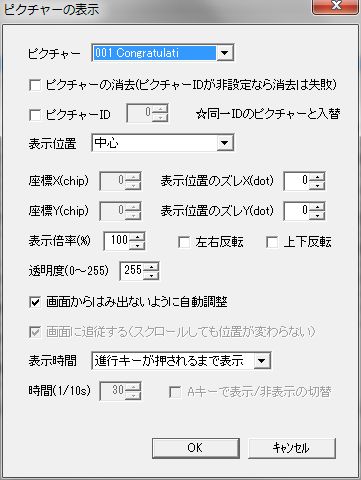
● Picture
The picture to display.
Can be specified from “Picture” in the database.
● Clear Picture
Clears the picture with the specified Picture ID.
If no ID is set, clearing fails.
● Picture ID
Replaces the picture with the specified Picture ID with the current picture.
Setting a Picture ID here allows you to replace or clear pictures at any time.
When executing the picture action, the program first searches for and clears the picture with the specified Picture ID from the stage, and then displays the new picture.
● Display Position
The display position of the picture.
・Specify by screen coordinates … Specify by screen coordinates. The top-left of the game screen is (0,0).
・Specify by stage coordinates … Specify by stage coordinates. The top-left of the stage is (0,0).
・Other (“Center” ~ “Top Right”) … Specify a general position. The display position is automatically adjusted based on the picture’s size.
● Coordinate X (chip)
● Coordinate Y (chip)
Coordinates when “Display Position” is “Specify by Screen Coordinates” or “Specify by Stage Coordinates”.
● Display Position Offset X (dot)
● Display Position Offset Y (dot)
Here you can fine-tune the picture’s display position in dot units.
● Scale (%)
The scale of the picture.
If set to anything other than “100” (%), the image will be rough and execution speed will slightly decrease.
● Horizontal Flip
Whether to flip the picture horizontally.
● Vertical Flip
Whether to flip the picture vertically.
● Transparency (0~255)
The transparency of the picture.
0 is completely transparent, 255 is completely opaque.
● Auto-adjust to stay within screen
Whether to adjust and display the picture, specified by “Display Position”, to just barely stay within the screen if it overflows.
● Follow screen
When displaying pictures that do not pause the entire game, whether the picture follows the screen (whether the picture’s screen coordinates change with stage scrolling).
● Display Time
The display time of the picture.
Display until advance key is pressed … Displays until the advance key (usually Z key) is pressed. The entire game pauses until the advance key is pressed.
Display until stage ends … Displays until the stage ends.
Specify by time … Displays until “Time” elapses.
● Time (1/10s)
The picture display time when “Display Time” is “Specify by Time”.
● Toggle display/hide with A key
Whether to toggle picture display/hide with the A key.
This also toggles the display/hide of the terrain effect information window at the bottom of the screen, so it serves a dual purpose.
Can be set if “Display Time” is “Display until stage ends”.
Wait
“Wait” Window
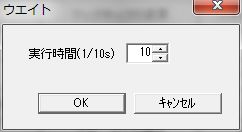
Pauses the entire game for a specified duration.
Explanation of setting items.
● Execution Time (1/10s)
Wait time.
Move Map Cursor
“Move Map Cursor” Window
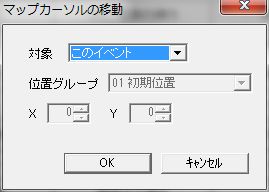
Since the map cursor (blue square cursor) on the stage map is always centered on the screen, the screen also moves as the map cursor moves.
Explanation of setting items.
● Target
The target to align the map cursor to.
● Position Group
If “Target” is “Specify by Position Group”, specify from “Position Group” on the stage.
● X, Y
If “Target” is “Specify by Stage Coordinates”, specify in stage coordinates.
Warp
“Warp” Window
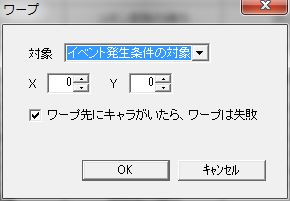
Instantly moves a character.
Explanation of setting items.
● Target
The character to warp.
”Target of Event Occurrence Condition” is only valid if the event has an occurrence condition “Target” set. However, even if multiple characters meet the occurrence condition, only one of them will be targeted.
● X, Y
Specify the warp destination coordinates in stage coordinates.
● If character exists at warp destination, warp fails
Whether the warp fails if a character exists at the warp destination.
If this is OFF, if a character exists at the warp destination, it will warp to an adjacent empty square.
Manipulate Enemy Group
“Manipulate Enemy Group” Window
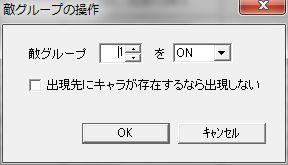
Enemy groups are like enemy appearance flags on the stage map.
By using this event action to toggle groups ON or OFF, you can make reinforcements or ambushes appear, or conversely, make enemies retreat as a group mid-stage.
With this, the event action “Manipulate Enemy Group” will be executed before the end of the enemy’s turn on Turn 5, and Enemy A and Enemy B, which are in Group 1, will appear.
However, if you want to repeatedly spawn a specific enemy from a specific square, such as endless reinforcements of the same enemy each turn, use the event action “Copy Enemy”.
For details, refer to “Copy Enemy”.
Explanation of setting items.
● Enemy Group
Set in the format: “[Group Number] to [ON/OFF]”.
● Do not appear if character exists at appearance destination
If this is OFF, if another character already exists in the square where enemies are supposed to appear, the enemy will appear in an adjacent empty square.
Copy Enemy
“Copy Enemy” Window
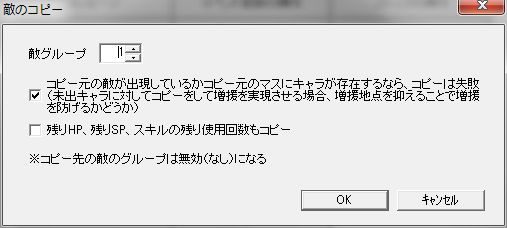
Copies all enemies in the specified group to increase the number of enemies.
The square where the copied enemy appears will prioritize the same square as the original if the original is not present (if the original’s group is OFF), and prioritize the 4 adjacent squares of the original if the original is present.
You can endlessly reinforce enemies by continuously copying the original without making it appear.
Note that the copied enemy’s group will be invalid (none).
With this, the event action “Copy Enemy” will be executed before the end of the enemy’s turn every 2 turns, and Enemy A and Enemy B from Group 1 will appear every 2 turns.
Explanation of setting items.
● Enemy Group
Enemy group number to copy.
Supports multiple enemies.
● If original enemy is present or character exists in original square, copy fails
Mainly, when reinforcing with enemies not yet appeared, whether preventing reinforcement by occupying the reinforcement point.
● Copy remaining HP, remaining SP, and remaining skill uses as well
Also copies the remaining HP, remaining SP, and remaining skill uses of the original.
If this is OFF, they will appear in a completely un-depleted state.
Place Ally
“Place Ally” Window
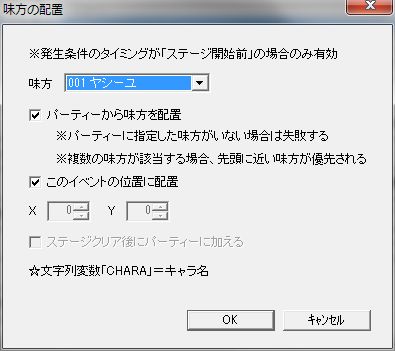
Places an ally character on the stage map.
This action is only effective when the occurrence condition’s timing is “Before stage start”.
In Simulation RPG Editor 2, you cannot summon ally reinforcements mid-stage.
The string variable “CHARA” will contain the name of the placed character.
Explanation of setting items.
● Ally
The ally character to place.
Specified from “Ally Character” in the database.
● Place ally from party
Whether to forcibly place an ally from the party.
If this is enabled, it will fail if the specified ally is not in the party. If multiple allies match, the ally closer to the front in the screen is prioritized.
If this is disabled, a guest character will join as an ally.
● Place at this event’s position
Whether to place the ally at this event’s position.
● X, Y
If “Place ally at this event’s position” is disabled, specify the placement position coordinates in stage coordinates here.
● Add to party after stage clear
If “Place ally from party” is disabled, a guest is placed. Whether to add that character to the party after stage clear.
However, it cannot be added to the party if the party is full (64 members).
If a guest dies mid-stage, they enter the revival list.
Change Initial Position
“Change Initial Position” Window
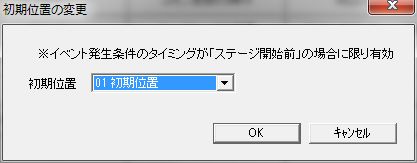
Changes the initial position (positions where allies can be placed) of ally characters.
Only effective when the event occurrence condition’s “Timing” is “Before stage start”.
The map cursor (screen) also moves according to the initial position change.
Explanation of setting items.
● Initial Position
Specify the initial position from “Position Group” on the stage.
Manipulate Event Variable
“Manipulate Event Variable” Window
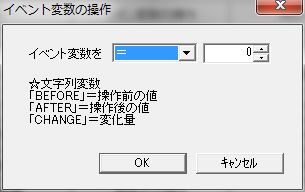
Manipulates event variables.
Only the single event variable belonging to this (the event being edited) event can be manipulated.
The string variable “BEFORE” will contain the value before the manipulation.
The string variable “AFTER” will contain the value after the manipulation.
The string variable “CHANGE” will contain the amount of change (= value after manipulation - value before manipulation).
Explanation of setting items.
● “Manipulate event variable [Operation Method] [Value]“
The content of the event variable manipulation.
Types of [Operation Method].
・”=” … Assigns [Value] to the event variable.
・”+” … Adds [Value] to the event variable.
・”-” … Subtracts [Value] from the event variable.
・”×” … Multiplies the event variable by [Value].
・”÷” … Divides the event variable by [Value].
・”÷ X Remainder” … Divides the event variable by [Value] and takes the remainder.
・“X %” … Calculates [Value] as a percentage of the event variable. For example, if [Value] is “50 (%)”, the event variable (result) becomes half of its original value.
Manipulate Common Variable
“Manipulate Common Variable” Window
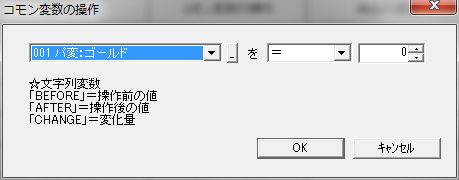
Manipulates common variables.
The string variable “BEFORE” will contain the value before the manipulation.
The string variable “AFTER” will contain the value after the manipulation.
The string variable “CHANGE” will contain the amount of change (= value after manipulation - value before manipulation).
Explanation of setting items.
● “Manipulate [Common Variable] [Operation Method] [Value]“
The content of the common variable manipulation.
Types of [Operation Method].
・”=” … Assigns [Value] to [Common Variable].
・”+” … Adds [Value] to [Common Variable].
・”-” … Subtracts [Value] from [Common Variable].
・”×” … Multiplies [Common Variable] by [Value].
・”÷” … Divides [Common Variable] by [Value].
・”÷ X Remainder” … Divides [Common Variable] by [Value] and takes the remainder.
・“X %” … Calculates [Value] as a percentage of [Common Variable]. For example, if [Value] is “50 (%)”, [Common Variable] (result) becomes half of its original value.
Change Map Chip
“Change Map Chip” Window
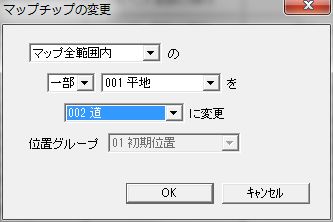
Changes all map chips in the specified range.
Explanation of setting items.
● “Change [Target] in [Range] to [New Map Chip]”
・[Range] … The effective range of [Target]. If “Within Position Group”, specify the position group in the separate item “Position Group”.
・[Target] … The map chip to manipulate.
・[New Map Chip] … The map chip after the change.
Change Event Graphic
“Change Event Graphic” Window
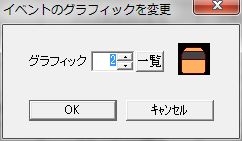
Changes the “Graphic” of this (the event being edited) event.
Explanation of setting items.
● Graphic
The graphic of the event.
Play Sound Effect
“Play Sound Effect” Window
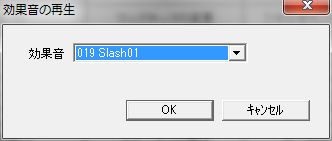
Plays a sound effect.
Explanation of setting items.
● Sound Effect
The sound effect to play.
Can be specified from “Sound Effect” in the database.
Change BGM
“Change BGM” Window
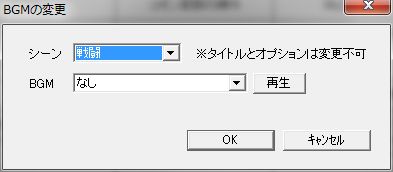
Changes the BGM for any scene.
Explanation of setting items.
● Scene
The scene for which to change BGM.
BGM for title and options cannot be changed.
● BGM
The new BGM.
Can be specified from “BGM” in the database.
● Loop Playback
Whether to loop playback.
Only effective when “Scene” is “Stage”.
Manipulate Status
“Manipulate Status” Window
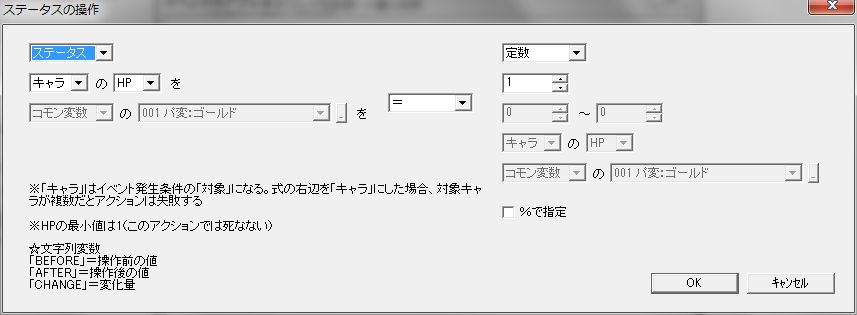
Manipulates character HP, SP, and variables.
Manipulation content will be expressed with simple formulas, but more complex settings than “Manipulate Common Variable” etc. can be made.
The string variable “BEFORE” will contain the value before the manipulation.
The string variable “AFTER” will contain the value after the manipulation.
The string variable “CHANGE” will contain the amount of change (= value after manipulation - value before manipulation).
Explanation of setting items.
The left side of the operator in the center of the window will be referred to as the left operand, and the right side as the right operand.
● (Left Operand)
Target of operation.
”Character” refers to the “Target” of event occurrence conditions, and you can manipulate HP or SP of multiple characters at once.
No matter how much HP is reduced with this action, the character will not die. (HP stops at 1).
● Operator
Operation method.
・”=” … Assigns the right operand to the left operand.
・”+” … Adds the right operand to the left operand.
・”-” … Subtracts the right operand from the left operand.
・”×” … Multiplies the left operand by the right operand.
・”÷” … Divides the left operand by the right operand.
・”÷ X Remainder” … Divides the left operand by the right operand and takes the remainder.
・“X %” … Calculates the right operand as a percentage of the left operand. For example, if the right operand is “50 (%)”, the left operand (result) becomes half of its original value.
● (Right Operand)
Operation value.
In addition to constants and random numbers, you can also specify character stats and variables similar to the left operand.
”Character” refers to the “Target” of event occurrence conditions, similar to the left operand, but if there are multiple “Characters” on the right operand, the action fails.
● Specify by %
Whether to calculate the right operand as a percentage of the left operand.
When manipulating “HP” and “SP”, it’s a percentage of the maximum value, not the current value.
For example, for a character with Max HP 100 and current HP 50,
“Character“‘s “HP” by ”-” “20” (with “Specify by %” ON)
executing this will subtract 20 (20% of Max HP 100), and the result will be 30.
Manipulate Gold
“Manipulate Gold” Window
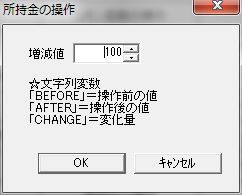
Manipulates the party’s gold.
Strictly speaking, it manipulates the party variable specified in Database “System 2” “Main Party Variable for Gold”.
The string variable “BEFORE” will contain the gold amount before the manipulation.
The string variable “AFTER” will contain the gold amount after the manipulation.
The string variable “CHANGE” will contain the amount of change (= gold amount after manipulation - gold amount before manipulation).
Explanation of setting items.
● Increase/Decrease Value
Amount to increase gold by.
Learn Skill
“Learn Skill” Window
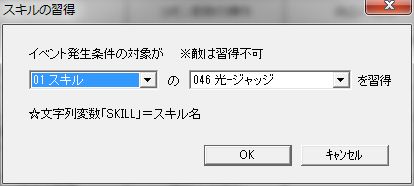
The “Target” of the event occurrence condition learns a skill.
Similar to learning by level up, skills cannot be learned if the required sense or slots are insufficient.
Also, enemies cannot learn skills.
The string variable “SKILL” will contain the name of the learned skill.
Explanation of setting items.
● “Target of event occurrence condition learns [Skill Group]‘s [Skill]“
Specifies the skill to learn.
Manipulate Stock
“Manipulate Stock” Window
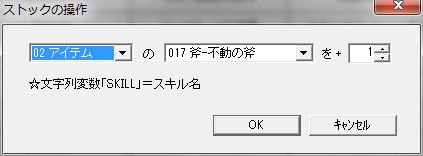
Increases skills in stock.
You can also decrease them by specifying a negative value.
The string variable “SKILL” will contain the name of the manipulated skill.
Explanation of setting items.
● “[Skill Group]‘s [Skill] by +[Increase/Decrease Value]“
Specifies the skill to increase/decrease and the increase/decrease value.
Add Goods
“Add Goods” Window
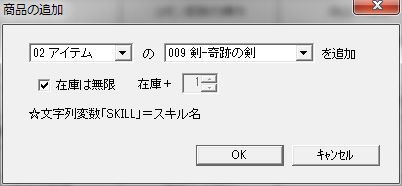
Adds goods (skills) to the shop’s lineup in the menu.
The string variable “SKILL” will contain the name of the added skill.
Explanation of setting items.
● “Add [Skill] from [Skill Group]“
The skill to add as an item.
● Infinite Stock
Whether stock is infinite.
● Stock +
If stock is not infinite, specify the stock quantity here.
Randomly Acquire Skill
“Randomly Acquire Skill” Window
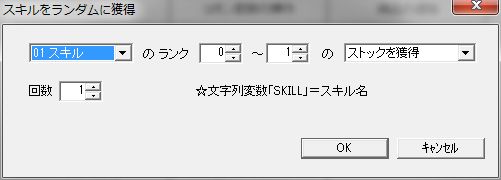
Randomly acquire skills by specifying skill group and rank, or increase shop inventory in the menu.
Even if it’s random, it’s not completely random.
By setting “Rank” and “Rarity” in Database “Skill”, you can adjust the acquisition rate of each skill.
If the skill’s rank is within the range set on the action side, it becomes a candidate for acquisition.
For example, if the skill’s rank is 1-2, ranks 1, 2, 1-2, or 1-3 on the action side will all be candidates for acquisition.
Once the acquisition candidates are narrowed down, only one of those skills is randomly selected.
At this time, the skill’s “Rarity” value directly becomes the acquisition rate.
For example, if Skill A has a rarity of 10 and Skill B has a rarity of 20, the probability of acquiring Skill B is twice that of Skill A.
The string variable “SKILL” will contain the name of the acquired skill.
If “Number of Times” is “2” or more, it will contain the name of the last acquired skill.
Explanation of setting items.
● “Acquire [Stock or Increase Inventory] of [Skill Group] with Rank [Min Rank] ~ [Max Rank]“
Here you can narrow down the target of random selection by specifying the skill group and rank range, and whether to acquire skills for stock or increase shop inventory.
You can not only acquire skills, but also increase shop inventory.
● Number of Times
The number of times to randomly acquire skills.
Change Ally Shop
“Change Ally Shop” Window
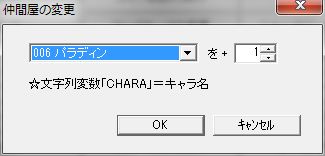
Manipulates the scout list in the menu “Scout”.
You can not only register characters in the scout list, but also remove them.
The string variable “CHARA” will contain the name of the manipulated character.
Explanation of setting items.
● “Add [Ally Character] by +[Increase/Decrease Value]“
Specifies the ally character to add to the scout list and the increase/decrease value.
Change Party
“Change Party” Window
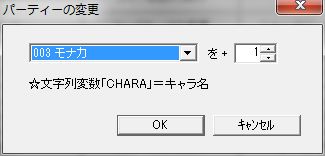
Changes the party.
You can not only add to the party, but also remove from it.
However, you cannot add to the party if it’s full (64 members).
When adding party members in an initial event, the very first character added automatically becomes the leader.
Furthermore, by disabling the menu’s “Leader” command in Database “System 6”, you can fix the leader.
The string variable “CHARA” will contain the name of the manipulated character.
Explanation of setting items.
● “Add [Ally Character] by +[Increase/Decrease Value]“
Specifies the ally character to add to the party and the increase/decrease value.
If [Increase/Decrease Value] is negative, you can remove allies from the party, but the leader cannot be removed.
Clear Stage
Clears the stage.
Actions after this action will not be executed.
Game Over
Causes game over.
Actions after this action will not be executed.