System Table of Contents
- Overview
- Editing “System 1”
- Editing “System 2”
- Editing “System 3”
- Editing “System 4”
- Editing “System 5”
- Editing “System 6”
- Editing “System 7”
- Editing “System 8”
- Editing “System 9”
- Editing “System 10”
Overview
To change game system settings, go to Database “System 1” to “System 10”.
In this work, system settings are also part of Main Menu > “Project” > “Database”. (Though it has no particular meaning).
Here you can configure character random ability increase (random elements in character generation), battle system settings, status name changes, and more.
There are “System 1” through “System 10”, but nearly half of them are merely for display settings and text changes for each menu command in the game.
Note that explanations for each menu are provided in “Game Explanation”, not on this page.
Editing “System 1”
Database “System 1” Window
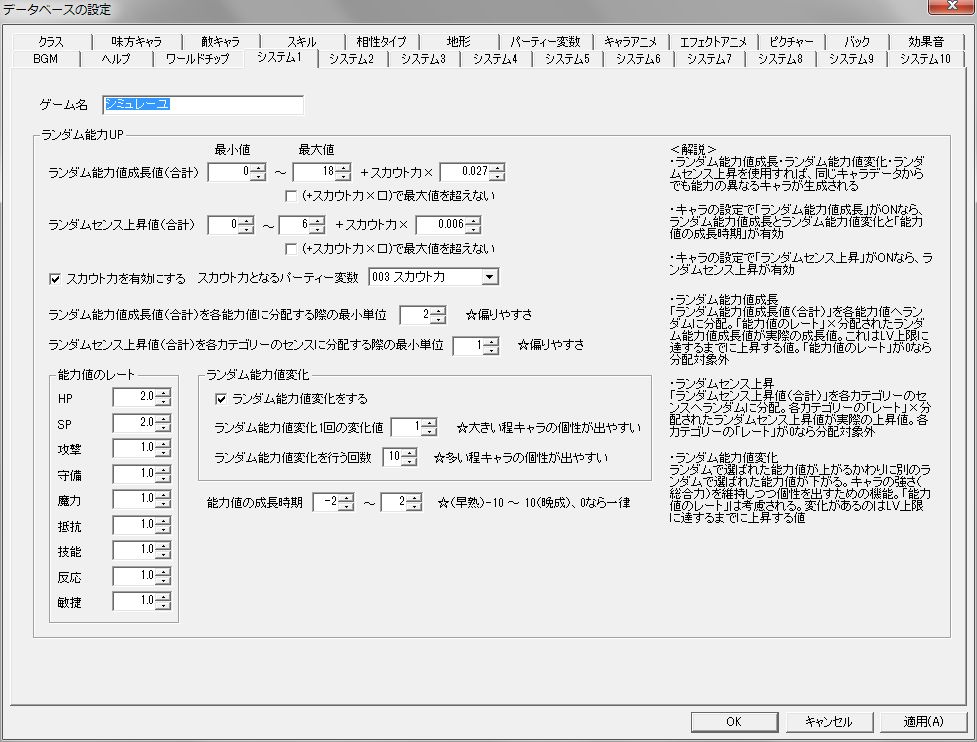
“System 1” mainly edits character random ability increase (random elements in character generation).
By using the three: random stat growth, random stat change, and random sense increase, characters with different abilities will be generated even from the same character data.
For understanding the system, please also refer to “Growth System”.
Now, let’s explain each setting item.
● Game Name
The title of the game.
Displayed in the game’s title bar.
“Random Ability Up” Frame
● Random Stat Growth Value (Total)
The total additional growth value for characters with random stat growth enabled.
This is the total of stat increases a character gains until reaching MAX LV.
Random stat growth values are set in the format: “[Min (Random) Value] ~ [Max (Random) Value] + Scout Power × [Increase per 1 Scout Power]”.
Checking ”(+ Scout Power × □) does not exceed max value” will prevent it from exceeding [Max Value] due to the addition of ” + Scout Power × [Increase per 1 Scout Power]”. (It will stop at [Max Value]).
To enable random stat growth itself, check “Random stat growth” in Database “Ally Character (Enemy Character)” settings.
● Random Sense Increase Value (Total)
The total sense increase value for characters with random sense increase enabled.
Random sense increase values are set in the format: “[Min (Random) Value] ~ [Max (Random) Value] + Scout Power × [Increase per 1 Scout Power]”.
Checking ”(+ Scout Power × □) does not exceed max value” will prevent it from exceeding [Max Value] due to the addition of ” + Scout Power × [Increase per 1 Scout Power]”. (It will stop at [Max Value]).
To enable random sense increase itself, check “Random sense increase” in Database “Ally Character” settings.
● Enable Scout Power
Whether to enable scout power.
If scout power is disabled, it is calculated as 0 in the “Random Stat Growth Value (Total)” and “Random Sense Increase Value (Total)” formulas.
Also, scout power no longer increases by the same amount during character level up, which is a specification.
If you enable scout power, specify the party variable that will be the actual scout power in “Party Variable for Scout Power”.
● Minimum unit for distributing random stat growth value (total) to each stat
In random stat growth, the “Random Stat Growth Value (Total)” is distributed to randomly selected stats (“HP” ~ “Agility”) in units set here.
The distributed random stat growth value × “Stat Rate” will be the actual growth value.
Therefore, the higher this value, the more prone stats are to bias.
● Minimum unit for distributing random sense increase value (total) to sense of each category
In random sense increase, the “Random Sense Increase Value (Total)” is distributed to the sense of randomly selected categories in units set here.
The distributed value × the corresponding category’s “Rate” will be the actual sense increase value.
Therefore, the higher this value, the more prone sense is to bias.
● Stat Rate (Frame)
The ease of increase for each stat growth value in random stat growth.
The distributed random stat growth value × “Stat Rate” will be the actual growth value.
Setting it to “0.0” will exclude it from distribution when “Random Stat Growth Value (Total)” is distributed to each stat.
● Perform Random Stat Change
Whether to perform random stat change.
To enable random stat change, you also need to enable “Random Skill Learning” in Database “Ally Character” settings.
In random stat change, a randomly selected stat increases, while another randomly selected stat decreases.
This allows for character individuality while maintaining overall strength.
● Change value per 1 random stat change
The change value for one random stat change.
This value × the corresponding category’s “Rate” is the actual change value for one random stat change.
Therefore, the higher this value, the more character individuality emerges, and the more prone stats are to bias.
● Number of random stat changes to perform
The number of random stat changes to perform.
A higher value increases character individuality.
● Stat growth timing
The character’s growth timing when “Random stat growth” in Database “Ally Character (Enemy Character)” is ON.
Set in the format “[Min (Random) LV] ~ [Max (Random) LV]”.
Both minimum and maximum values are set within the range of “-10” to “10”.
Smaller values mean early bloomer types, where stats increase significantly upon level up at lower levels.
Larger values mean late bloomer types, where stats increase significantly upon level up at higher levels.
”0” means average growth at all levels.
Editing “System 2”
Database “System 2” Window
“System 2” lacks a bit of consistency…
You can set some costs for menu executions and system settings in the stage map, etc.
Each setting item is explained below.
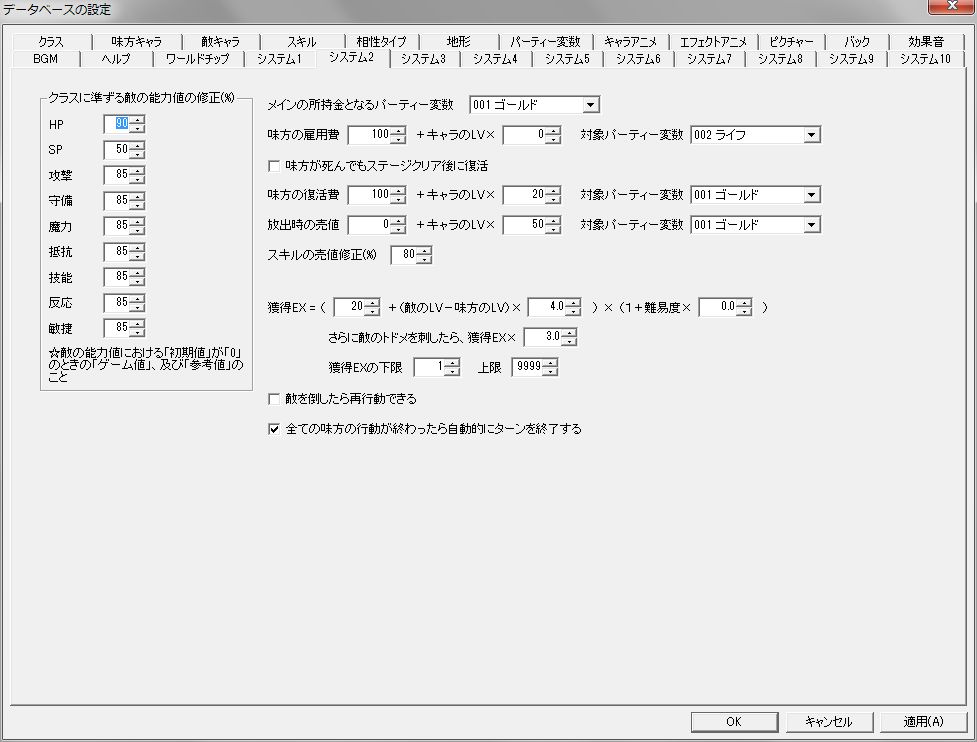
● Enemy stat correction (%) according to class
**If you have set the initial value of stats to “0” in Database “Enemy Character”, the initial and final values of Database “Class” will be applied. Here, you can apply corrections to those initial and final values.
It also applies similarly to the reference value of Database “Enemy Character”.
**Specify this value as a percentage of the initial and final values in Database “Class”.
For example, if you want enemies to be slightly weaker than allies (and thus more numerous) even if they are in the same class, set “Attack” to “80” (%) or similar.
● Party variable for main gold
The party variable specified here can be manipulated with the event action “Manipulate Gold”. (That’s all).
● Ally hiring cost
The cost of hiring allies in the menu “Scout”.
Set in the format: “[Base Value] + Character LV × [Increase per 1 LV difference]”.
Additionally, specify the corresponding party variable in “Target Party Variable”.
● Allies revive after stage clear even if they die
Whether allies automatically revive after stage clear even if they die in combat.
● Ally revival cost
The cost of reviving allies in the menu “Revive”.
Set in the format: “[Base Value] + Character LV × [Increase per 1 LV difference]”.
Additionally, specify the corresponding party variable in “Target Party Variable”.
● Discharge selling price
The money gained when discharging allies in the menu “Discharge”.
Set in the format: “[Base Value] + Character LV × [Increase per 1 LV difference]”.
Additionally, specify the corresponding party variable in “Target Party Variable”.
● Skill selling price correction (%)
Specify the money obtained when selling skills as a percentage of the skill’s “Price”.
● EX gained
EX gained is set in the format: ”([Base Value] + (Enemy LV - Ally LV) × [Increase per 1 LV difference]) × (1 + Difficulty × [Multiplier per 1 Difficulty])” and “Furthermore, if the enemy is finished off, EX gained × [Multiplier when finished off]”.
Since LV increases by 1 each time EX reaches 100 regardless of character LV, it’s recommended to apply a correction to EX gained based on LV difference by setting [Increase per 1 LV difference].
”Minimum EX Gained” and “Maximum EX Gained” can also be set.
● Can re-act after defeating an enemy
Whether an ally can re-act after defeating an enemy on their turn.
● Automatically end turn after all allies have acted
Whether to automatically end the turn after all allies have acted.
This is convenient because you don’t have to manually select “End Turn” from the map’s system menu (the menu called up by the Z key).
● Enable Leader System
If the leader system is enabled, not having a leader will prevent progression when transitioning from the world map to a stage, and a leader’s placement is required on stages.
Disabling the leader system eliminates the concept of a leader itself, so the leader mark will also not be displayed.
Note that leader’s death does not equate to game over. (If you want it to, set it up with an event).
● Behavior of Skill Compatibility Type “None”
Behavior when a skill with “Compatibility Type” set to “None” is used.
・“Does not maintain current compatibility type, becomes no compatibility type” … The skill user’s compatibility type becomes no compatibility type, regardless of the current (before skill use) compatibility type.
・“Maintains current compatibility type” … The skill user’s compatibility type remains the current (before skill use) compatibility type. Basically, choose this if you want to fight with the compatibility type set in the class until the end of combat, etc.
● Display compatibility type in bottom right of character symbol (Toggle display with S key. Also displayed in combat if manual combat)
The display/hide of compatibility types on the screen and stage map can be toggled at any time by pressing the S key during the game, but unchecking this will keep the compatibility type always hidden and disable the S key.
Editing “System 3”
Database “System 3” Window
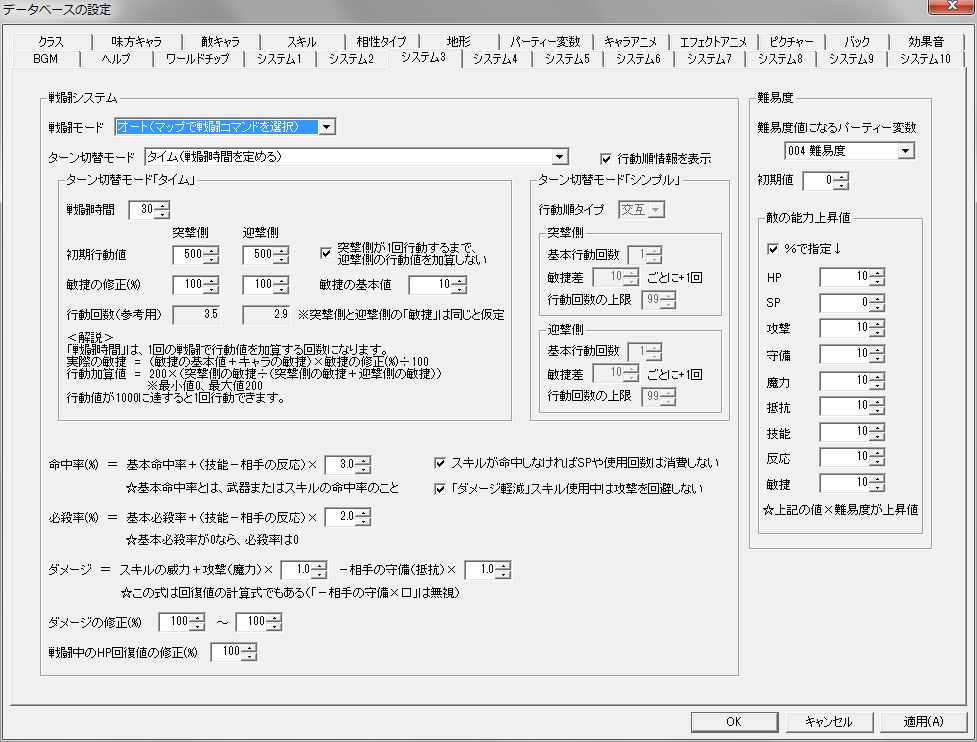
“System 3” primarily focuses on setting up the combat system and formulas used in combat.
For understanding the combat system, please also refer to “Combat System”.
Each setting item is explained below.
“Combat System” Frame
● Combat Mode
A dialog for selecting combat mode appears at the editor’s initial launch, but you can switch it at any time here.
The combat mode changes not only combat but also the procedures for and stage map actions, enemy movement AI behavior, and useful skills, making it a completely different work. So, decide on one as early as possible.
There are two types of combat modes:
○ Manual
A mode adopted in the previous work where actions are selected during combat.
There are 4 types of combat commands: “Attack”, “Skill”, “Quick”, and “Stock”.
”Attack” activates the normal attack skill set for each class.
”Quick” allows using skills once per turn without consuming a turn, making it easy to utilize even non-damaging support skills.
”Stock” allows using skills that are not learned.
Enemy movement AI is less precise than in auto-battle.
○ Auto
Combat is conducted only with skills equipped in and stage map.
The “Equip” option in the Skill menu and stage map action menu becomes available.
Depending on settings, non-damaging “Damage Reduction,” “Support,” “Time,” and “Terrain” skills also have some effect, but they are subtle as only those are used during combat.
Enemy movement AI is superior to manual combat because the skills used in combat are fixed.
● Turn Transition Mode
How to determine the turn order of allies and enemies in combat.
There are two types of turn transition modes:
(The side that initiates an attack on the stage map is the “Initiating Side”, and the side that is attacked is the “Defending Side”)
○ Time
Combat time and action values are set, and these, along with the character’s “Agility”, determine the action order.
Specifically, for every 1 unit of “Combat Time” elapsed, action values are added according to the following formula:
Actual Agility = (“Base Agility” + Character’s “Agility”) × “Agility Correction (%)” ÷ 100
Action Value Added = 200 × (Initiating Side’s Agility ÷ (Initiating Side’s Agility + Defending Side’s Agility)) *Min Action Value Added is 0, Max is 200
When action value reaches 1000, 1 action can be taken.
”Agility” in the formula for calculating action value added refers to “Actual Agility”.
The action order information (allies as blue line, enemies as red line) is displayed on the time bar at the top of the combat screen, but this is merely a prediction. If “Agility” changes due to support skills during combat, the action order and number of actions will also change.
Furthermore, it supports skills that manipulate time, so “Time” mode offers greater strategic freedom.
However, this mode is more complex and difficult to balance.
○ Simple
Sets action order and number of actions.
The initiating side always goes first.
The number of actions is “Base Number of Actions” + additional actions based on agility difference.
Since action order and number of actions are fixed at the start of combat, even if “Agility” changes due to support skills during combat, there will be no change in action order or number of actions.
Also, skills that manipulate time have no effect.
● Display action order information
Whether to display the time bar at the top of the combat screen.
If “Turn Transition Mode” is “Simple”, not displaying it might make it cleaner.
“Combat System” Frame’s “Turn Transition Mode ‘Time’” Frame
(Only effective when Turn Transition Mode is “Time”)
● Combat Time
Combat time.
The number of times action values are added in one combat.
● Initial Action Value (Initiating Side and Defending Side)
Action value immediately after combat starts.
● Agility Correction (%) (Initiating Side and Defending Side)
Specify actual agility (agility used to calculate action value added) as a percentage of (“Base Agility” + character’s “Agility”).
● Do not add defending side’s action value until initiating side acts once
If this is checked, the defending side’s action value will not be added until the initiating side has acted once.
In other words, the initiating side can definitely perform a preemptive strike.
● Base Agility
Actual agility (agility used to calculate action value added) is calculated as (“Base Agility” + character’s “Agility”) × “Agility Correction (%)” ÷ 100. Therefore, a higher “Base Agility” means the character’s “Agility” has less impact.
So, if you’re having trouble with too much difference in action count due to character agility differences, increase this value.
● Number of Actions (Initiating Side and Defending Side)
Here, the average number of actions in one combat calculated based on the settings in Turn Transition Mode “Time” is displayed.
However, the number of actions is calculated assuming that the “Agility” of both the initiating and defending sides is the same.
“Combat System” Frame’s “Turn Transition Mode ‘Simple’” Frame
(Only effective when Turn Transition Mode is “Simple”)
● Action Order Type
How to determine action order.
・“Alternating” … Initiating side acts once → Defending side acts once, repeated.
・“Consecutive” … Defending side acts after the initiating side has used all its actions.
● Base Number of Actions (Initiating Side and Defending Side)
Base number of actions.
● “Increase by 1 action per [Agility Difference]” (Initiating Side and Defending Side)
Additional actions based on agility difference (Your “Agility” - Opponent’s “Agility”).
● Maximum Number of Actions (Initiating Side and Defending Side)
Maximum number of actions.
End of “Combat System” Frame’s “Turn Transition Mode ‘Simple’” Frame
● Accuracy (%)
Formula for calculating skill accuracy in combat.
Set in the format: “Accuracy (%) = Base Accuracy + (Skill - Opponent’s Reaction) × [Accuracy Increase per 1 (Skill - Opponent’s Reaction)]”.
”Base Accuracy” is the skill’s own accuracy.
● If skill does not hit, do not consume SP or uses
Whether to avoid consuming SP or uses if the skill does not hit.
● Do not evade attacks while “Damage Reduction” skill is active
Whether opponent’s attacks have 100% accuracy while “Damage Reduction” skill is active.
It’s complex to evade while using “Damage Reduction” skill, and if “If skill does not hit, do not consume SP or uses” is enabled, you can reliably deplete the opponent, so I think it’s not a bad setting.
● Critical Rate (%)
Formula for calculating skill critical rate in combat.
Set in the format: “Critical Rate (%) = Base Critical Rate + (Skill - Opponent’s Reaction) × [Critical Rate Increase per 1 (Skill - Opponent’s Reaction)]”.
”Base Critical Rate” is the skill’s own critical rate.
If base critical rate is 0, no critical hit will occur no matter how high skill is.
Note that critical hits deal 2 times damage.
● Damage
Damage is set in the format: “Damage = Skill Power + Attack (Magic) × [Damage per 1 Attack (Magic)] - Opponent’s Defense (Resistance) × [Damage Reduction per 1 Opponent’s Defense (Resistance)]”.
This formula is also for calculating recovery value in healing skills, but the ” - Opponent’s Defense (Resistance) × [Damage Reduction per 1 Opponent’s Defense (Resistance)]” part is ignored.
In other words, “Recovery Value = Skill’s Recovery Value + Magic × [Recovery Value per 1 Magic]”.
For final damage calculation including corrections by attributes and compatibility types, refer to “Damage Calculation”.
● Damage Correction (%)
Here you can set damage variation.
Set as a percentage, in the format “[Min Value (Random Min)] ~ [Max Value (Random Max)]”, where damage calculated by the “Damage” formula is 100 (%).
For example, if set to 100120, damage will vary within the range of 1.0x1.2x.
● HP recovery value correction (%) during combat
Correction rate for HP recovery value in healing skills during combat.
Set as a percentage, where the recovery value calculated by the “Damage” formula is 100 (%).
This only applies during combat and not when recovering on the stage map.
For example, if set to 50, using a healing skill in combat will only recover half the amount recovered when used on the stage map.
Being able to heal at any time in combat might make it too easy for the player and reduce strategic depth in a simulation game, so it might be good to set this value low.
● Skill name display time (1/60s) just before action
Display time for the skill name displayed above the acting character’s head just before action (after command input in manual combat).
Character animation begins after this time elapses.
● Continue displaying skill name until effect ends
Whether to continue displaying the skill name above the acting character’s head until the skill’s effect ends.
“Difficulty” Frame
● Party variable for difficulty value
The party variable that holds the difficulty value.
For example, if the specified party variable’s value is 2, the difficulty is also 2, and changing the difficulty from the menu “Config” also changes the party variable’s value.
The upper and lower limits of difficulty also follow the settings in Database “Party Variables”.
● Initial Value
Initial difficulty value.
● Enemy ability increase value
This value × difficulty becomes the actual increase value.
If “Specify by %” is checked, you can specify as a percentage of enemy character’s stats before learning weapon/armor skills (character’s own stats).
Editing “System 4”
Database “System 4” Window
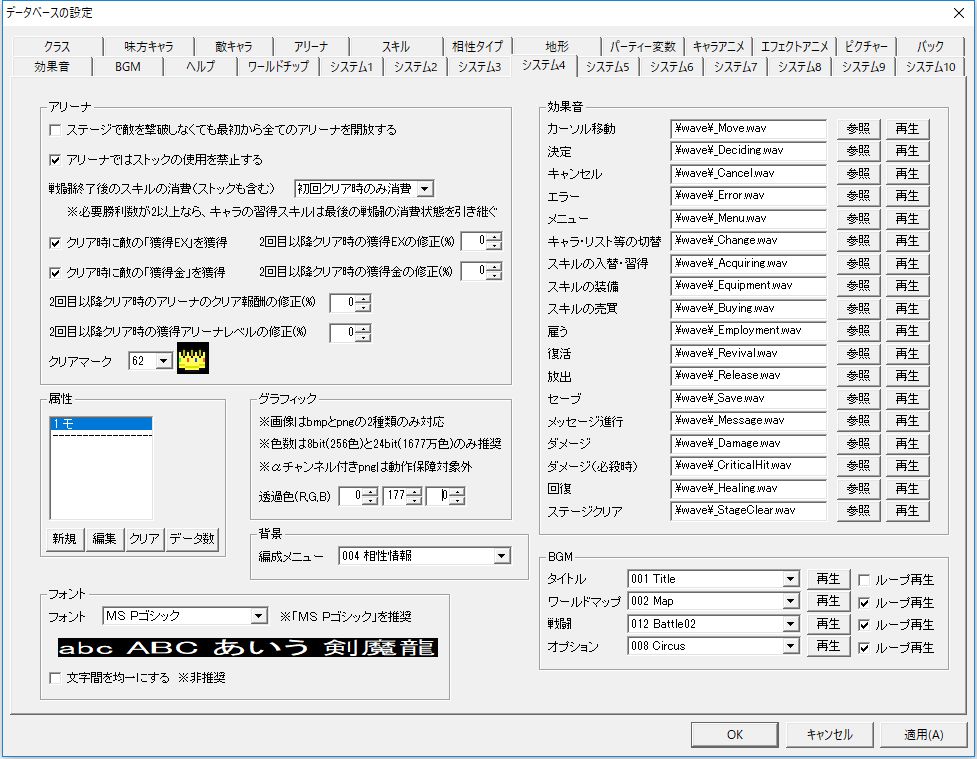
“System 4” allows editing of the Arena system settings, attributes appearing in the game, graphics related settings, system sound effects, and BGM outside of the stage map.
Each setting item is explained below.
“Arena” Frame
● Unlock all arenas from start without defeating enemies on stage
Whether to register all arenas in the training arena list from the beginning of the game.
If this is unchecked, arenas will not be registered unless you defeat enemies corresponding to them on the stage map, similar to the training enemy list.
● Prohibit stock use in arena
Prohibits stock use only in arena battles.
● Skill consumption after combat (including stock)
If allied characters consume skills in arena combat (remaining uses decrease), whether to carry that over as the state after training ends.
If you set this to “Consume only on first clear” or “Consume only on clear”, “Required Wins” is recommended to be “1”. This is because HP, SP, and remaining skill uses fully recover when one battle’s outcome is decided and the next battle starts, so ultimately, only the skill consumption state of the last battle can be carried over.
● Acquire enemy’s “EX Gained” upon clear
Whether to acquire EX upon arena clear, similar to combat on the stage map.
● Correction (%) for EX gained on subsequent clears
When acquiring EX upon arena clear, you can change the amount gained for the first clear and subsequent clears here.
Specify the correction rate for EX gained on subsequent clears as a percentage.
● Correction (%) for gold gained on subsequent clears
When acquiring “Gold Gained” set for enemy characters upon arena clear, you can change the amount gained for the first clear and subsequent clears here.
Specify the correction rate for gold gained on subsequent clears as a percentage.
● Correction (%) for arena clear reward on subsequent clears
You can change the amount of “Clear Reward” set in arena data for the first clear and subsequent clears.
Specify the correction rate for the amount gained on subsequent clears as a percentage.
● Correction (%) for arena level gained on subsequent clears
You can change the amount of “Arena Level Gained” set in arena data for the first clear and subsequent clears.
Specify the correction rate for the amount gained on subsequent clears as a percentage.
● Clear Mark
The mark indicating arena clear, displayed to the left of each arena name in the training arena list.
Clear marks are specified from symbol graphics.
End of “Arena” Frame explanation
● Attribute (Frame)
Types of attributes that appear in the game.
Clicking “Insert” or “Edit” will open a window for editing attributes.
Attribute “Names” are only displayed in the editor and not in the game.
In Database “Skill”, you can set “Attributes”, and in Database “Class”, you set “Attribute Resistance”.
This allows for effects such as dealing double damage when hitting a weak attribute.
● Graphic (Frame)
“Transparency Color (R,G,B)” specifies the transparency color used in image files (bmp or png) in RGB format.
The default setting and default image transparency color are unified to (0,177,0), so leave it as is if there’s no problem.
Although I once planned to fully support pngs with alpha channels, and I believe they can still be used, they are ultimately not officially supported.
If you still want to use pngs with alpha channels, set the alpha value to 0 for transparency instead of specifying a transparency color here.
● Background (Frame)
Backgrounds for each scene.
Specified from “Background” in the database.
● Font (Frame)
The type of font used for all text displays.
”MS P Gothic” is recommended… this is because Simulation RPG Editor 2 adjusts text display positions and spacing on the premise that the font is “MS P Gothic”.
Also, the Simulation RPG Editor 2 author has not properly tested with fonts other than “MS P Gothic”.
”Decoration” allows you to add shadows and borders, but this may slightly reduce execution speed (potentially making it heavier).
If the text display position or spacing is incorrect, enabling “Even out character spacing in text display” might improve it, but it can also have the opposite effect. For “MS P Gothic,” display position and spacing are already adjusted independently of this setting, so it is not recommended.
● Sound Effects (Frame)
System sound effects.
Only PCM wave format is supported; other formats (such as ADPCM) will not play in the game even if they play in the editor.
Always specify sound effect files from the “wave” folder. (If using your own sound effects, also put them in the “wave” folder.)
● BGM (Frame)
BGM to be played in each scene.
Specified from “BGM” in the database.
You can also choose whether to “Loop Playback”.
Editing “System 5”
Database “System 5” Window
“System 5” allows display settings and name changes for each character stat.
Also, “System 5” through “System 8” primarily focus on display settings and name changes for menu commands.
Be careful, as you must enable at least one command in each menu, or the game will crash.
Each setting item is explained below.
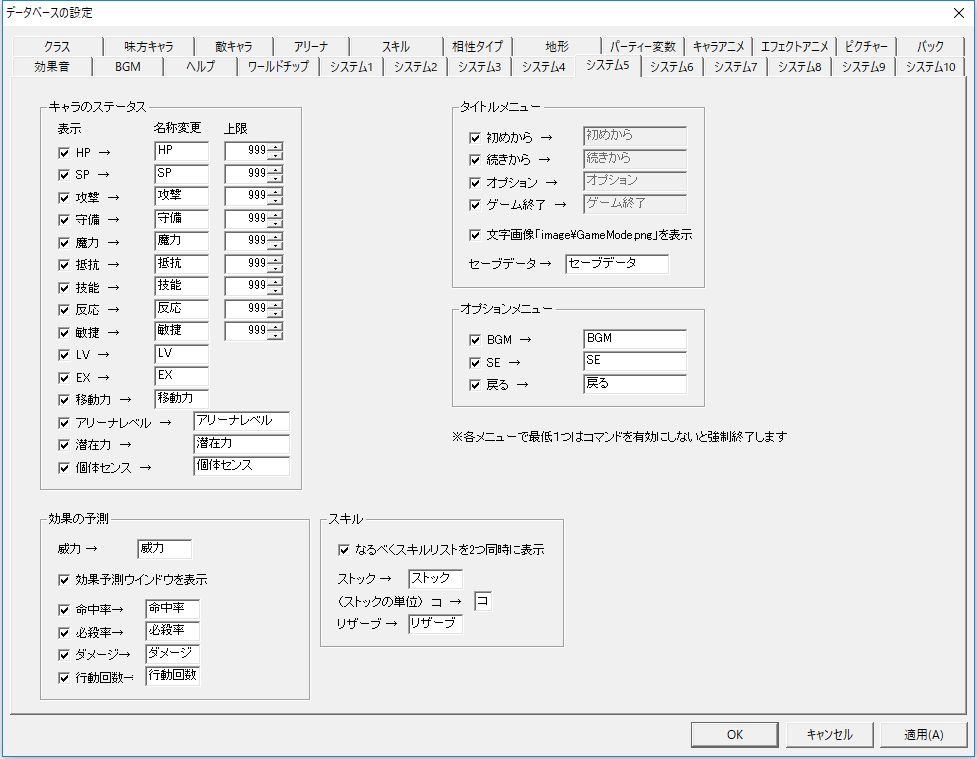
● Character Stats (Frame)
Sets display/hide, name change, and upper limit for character stats “HP” ~ “Agility” and “LV”, “EX”, “Movement”.
Unchecking the left checkbox hides that item.
For example, unchecking the “SP” display checkbox can remove SP display from the status window and level-up growth results.
”HP” “Upper Limit” is also the damage upper limit.
”Arena Level” upper limit is fixed at 999,999.
”Potential” is a value close to (but not equal to) “Random Stat Growth Value (Total)” in Database “System 1”, so displaying this allows you to assess the future potential of characters with random stat growth enabled in the menu “Scout”.
”Individual Sense” is the sum of values converted by distributing “Random Sense Increase Value (Total)” in Database “System 1” to each category and converting it by each category’s “Rate”. Displaying this allows you to assess the future potential of characters with random sense increase enabled in the menu “Scout”.
For “Arena Level”, “Potential”, and “Individual Sense”, if the value is 0, the item itself will not be displayed in the status window, which is a specification.
For explanations of each stat, refer to “Stats”.
● Effect Prediction (Frame)
Display settings for the action (skill) effect prediction window.
The effect prediction window is displayed in manual combat when an action is selected, and in auto-combat when initiating combat on the stage map, as well as at the bottom of the combat screen.
Only “Power” refers to the power of the equipped skill displayed in the bottom right of the status window on the screen or stage map during auto-combat, not within the effect prediction window.
Also, HP display in the effect prediction window follows the “HP” setting in the “Character Stats (Frame)” of this “System 5” tab.
Unchecking the left checkbox hides that item.
● Skill (Frame)
Skill-related display settings.
If you have created two or more skill groups (skill lists) in Database “Skill”, enabling “Display skill list as two lists if possible” can drastically improve skill browsing.
Even if this is enabled, it’s “as possible” because only one list will be displayed in situations where there isn’t enough display space.
● Title Menu (Frame)
Whether to display (enable) each command in the title screen menu.
Command text can also be changed.
If “Display image on title screen” is checked, an image will be displayed instead of text.
The image path will be “bmp\GameMode.png” (relative path).
For title menu explanation, refer to “Title Screen and Options”.
● Option Menu (Frame)
Whether to display (enable) each command in the “Options” menu.
Command text can also be changed.
For option menu explanation, refer to “Title Screen and Options”.
Editing “System 6”
Database “System 6” Window
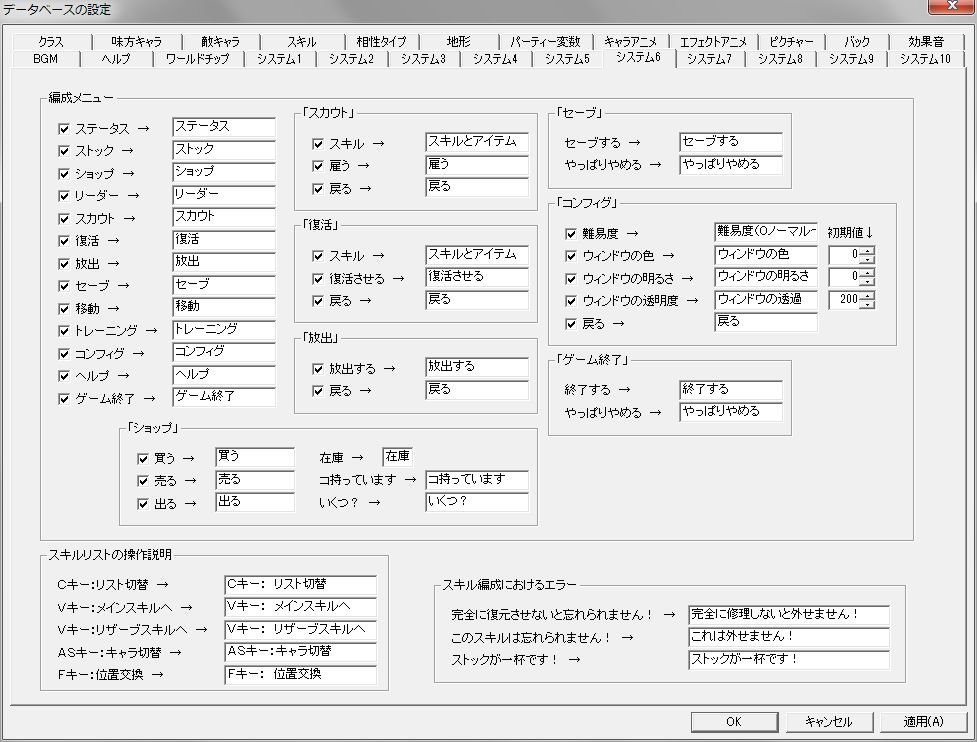
“System 6” primarily focuses on display settings and name changes for menu commands.
Be careful, as you must enable at least one command in each menu, or the game will crash.
Each setting item is explained below.
● Organization Menu (Frame)
Whether to display (enable) each command in the menu.
However, “Training” settings are done in “System 7”.
Command and other text can also be changed.
You can also set the initial window color settings for the menu “Config”.
For Organization Menu explanation, refer to “Organization Menu”.
● Skill list operation explanation (Frame)
You can change the operation explanation for skill organization, which can be done from the menu “Status”.
Text for errors during skill organization can also be changed.
For skill organization explanation, refer to “Organization Menu”.
Editing “System 7”
Database “System 7” Window
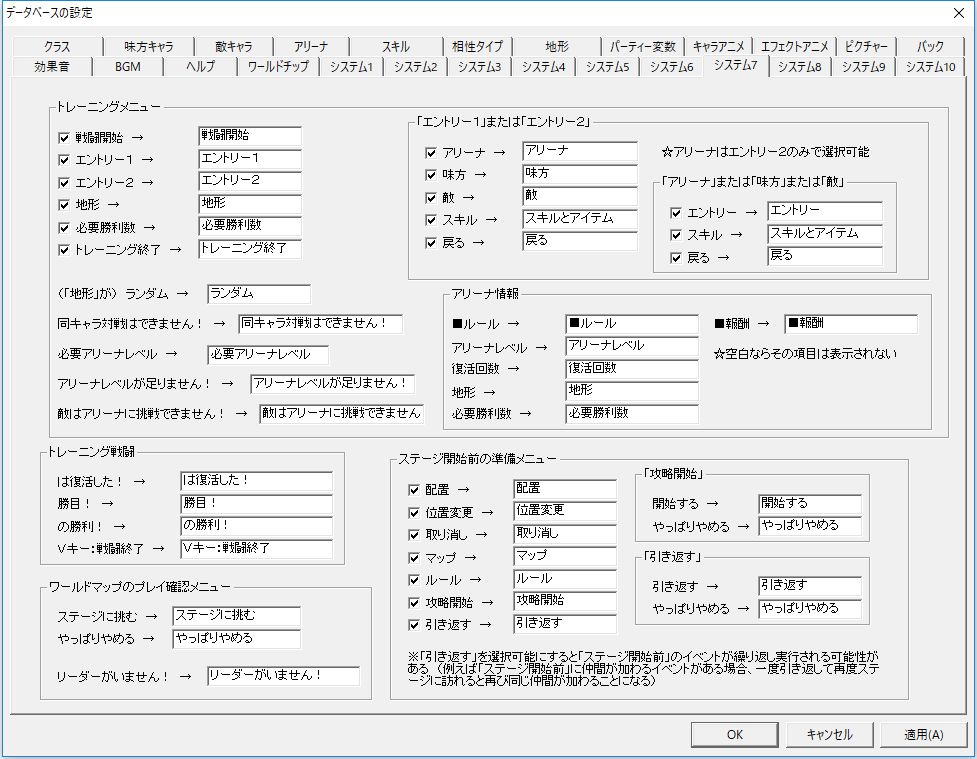
“System 7” primarily focuses on display settings and name changes for menu commands.
Be careful, as you must enable at least one command in each menu, or the game will crash.
Each setting item is explained below.
● Training Menu (Frame)
Whether to display (enable) each command in the menu “Training”.
Command and other text can also be changed.
”Arena” for entry is displayed only in “Entry 2” and not in “Entry 1”.
Text in the “Arena Info” frame can exceptionally be hidden cleanly from the game screen by being left blank.
For training menu explanation, refer to “Organization Menu”.
● Training Combat (Frame)
You can change the text displayed in the menu “Training” combat.
● World Map Play Confirmation Menu (Frame)
Whether to display (enable) each command in the play confirmation menu when challenging a stage on the world map.
Command and other text can also be changed.
● Preparation Menu Before Stage Start (Frame)
Whether to display (enable) each command in the preparation menu, where you can place allies and confirm rules before the stage starts.
However, be careful if you enable “Turn back”, as events with “Before stage start” timing may repeatedly execute.
For example, if there’s an event where allies join “Before stage start”, returning once and revisiting the stage will cause the same allies to join again.
Also, command text can be changed.
For preparation menu explanation before stage start, refer to “Preparation Menu Before Stage Start”.
Editing “System 8”
Database “System 8” Window
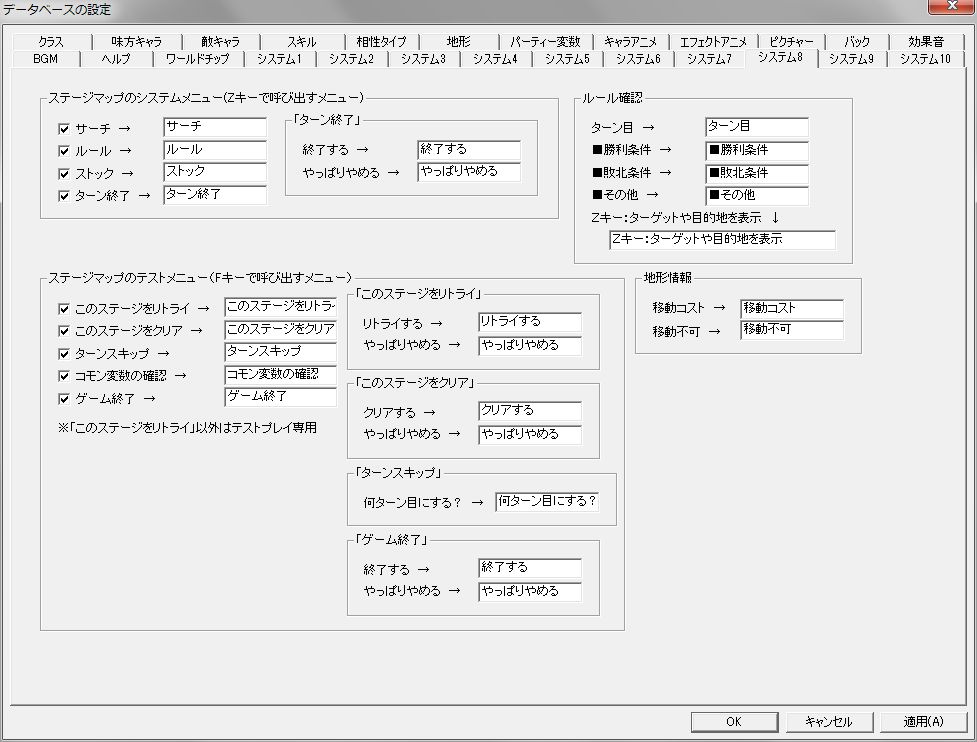
“System 8” primarily focuses on display settings and name changes for menu commands.
Be careful, as you must enable at least one command in each menu, or the game will crash.
Each setting item is explained below.
● Stage Map System Menu (Frame)
Whether to display (enable) each command in the system menu, which can be accessed by pressing the Z key where there are no characters on the stage map.
Command text can also be changed.
For stage map system menu explanation, refer to “Stage Map System Menu”.
● Stage Map Test Menu (Frame)
Whether to display (enable) each command in the test menu, which can be accessed by pressing the F key on the stage map.
Everything except “Retry this stage” is displayed only in test play, so even if checked here, it won’t be displayed in test play.
Command text can also be changed.
For stage map test menu explanation, refer to “Stage Map Test Menu”.
● Rule Confirmation (Frame)
You can change the text displayed in the rule confirmation menu before stage start or in the stage map system menu “Rules”.
● Terrain Information (Frame)
You can change the text displayed in the terrain information window at the bottom of the stage map.
Note that this window’s display/hide can be toggled with the A key.
Editing “System 9”
Database “System 9” Window

“System 9” allows display settings and name changes for menu commands, as well as settings related to the environment configuration file “System.ini”.
Be careful, as you must enable at least one command in each menu, or the game will crash.
Each setting item is explained below.
● Character Action Menu (Frame)
Whether to display (enable) each command in the ally action menu on the stage map.
Command text can also be changed.
For character action menu explanation, refer to “Ally Character Movement and Actions”.
● Combat Menu (Frame)
Whether to display (enable) each command in the ally combat menu during manual combat.
Command text can also be changed.
For combat menu explanation, refer to “Combat System”.
● Combat Message (Frame)
You can change the text displayed during combat.
● System.ini (Frame)
Settings for the environment configuration file “System.ini”.
Explanations for each item are provided within “System.ini”.
The program reads data (characters) from “System.ini” sequentially from top to bottom until the “Exit” line is found.
If an “identification string” is not found before the “Exit” line is read, that item will use its “default value”.
For example, if you want to prohibit fullscreen, set the window mode “Default Value” to “2” or “1”, and then delete the line “WindowMode=*” in “System.ini”.
Editing “System 10”
“System 10” currently has no setting items.