Stage and Palette Editing Table of Contents
- Understanding the Window
- Data Placement and Pen Types
- Special Operations in the Stage Window
- Palette Editing
Understanding the Window
Editor Main Screen
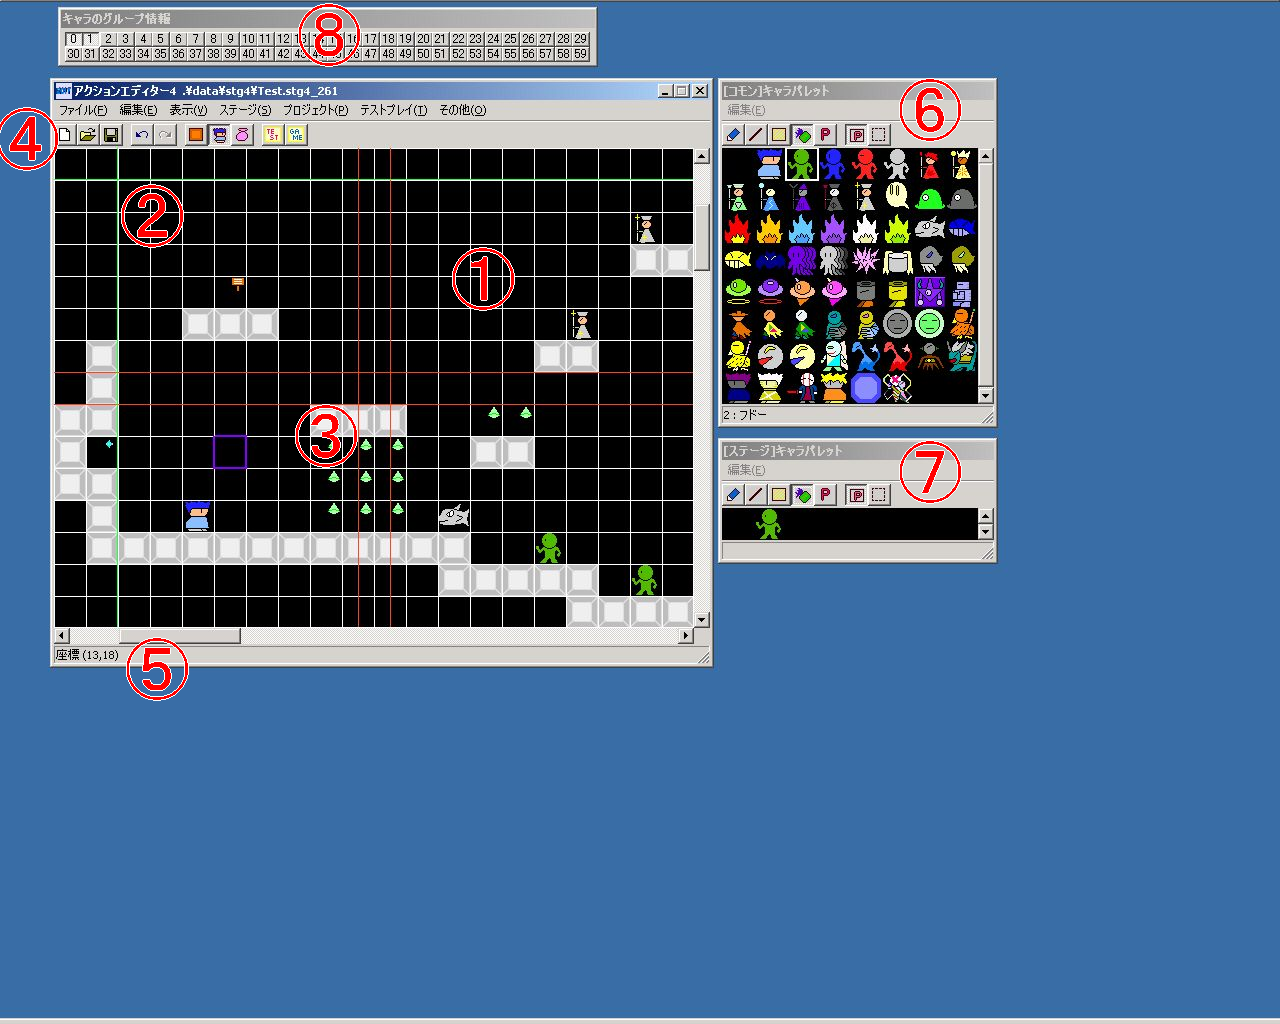
● 1. Stage
The stage currently being edited.
The stage consists of three layers: blocks, characters, and items, with only items displayed in miniature.
● 2. Scroll Limit Line
The green line represents the scrollable area and is called the “scroll limit line.”
The parts outside this line will not be displayed in the game.
For scrollable area settings, refer to Main Menu “Stage” > “Stage Settings”.
● 3. Position Confirmation Line
The four red lines crossing in the center of the window are called “position confirmation lines.”
They indicate “the protagonist is at this position” when the currently displayed area is visible in the game.
Outside the edges of the scrollable area, the protagonist is positioned in the center of the screen, so by looking at the position confirmation lines, you can tell the protagonist’s position when the currently displayed area is visible. (※However, this is only when the window is maximized.)
These lines will be very useful when placing enemies that only start acting once they enter the screen, for example.
● 4. Toolbar
From left: “Create New Stage”, “Open Stage”, “Overwrite Save Common Palette & Overwrite Save Stage”, “Undo”, “Redo”, “Switch to Block Palette”, “Switch to Character Palette”, “Switch to Item Palette”, “Test Play”, “Test Play Entire Game”.
● 5. Status Bar
The stage coordinates of the cursor’s current cell are displayed here.
● 6. Common Palette Window
The window displaying the common palette.
You can change the data to be placed on the stage and the pen, or edit the common palette.
● 7. Stage Palette Window
The window displaying the stage palette.
You can change the data to be placed on the stage and the pen, or edit the stage palette.
● 8. Group Window
Used group numbers in the stage are visible at a glance.
Used numbers (buttons) are indented.
For group details, refer to “Character Settings”.
Data Placement and Pen Types
Clicking on the stage places the currently selected data.
Data corresponding to the current palette mode will be placed (e.g., blocks will be placed in block palette mode), so switch the palette mode as needed by pressing “Change Palette” in the main menu “Edit” or the toolbar button.
To change the data to be placed, click on the desired data in the palette window.
Also, right-clicking on the stage allows you to select the data at the cursor position as the next data to place (eyedropper function).
※If your computer is under heavy load, attempting to place many data at once or select many data at once with a right-click may cause the process to fail.
The way data is placed changes depending on the selected pen.
You can change the pen by clicking the button on the left of the toolbar in the common palette window or stage palette window.
Pen Toolbar

The types of pens are as follows:
● Normal Pen 
Simply places one square at a time.
● Line Pen 
Drags the mouse to place in a straight line.
● Square Pen 
Drags the mouse to place in a rectangular shape.
● Fill Pen 
Fills an area with the data at the cursor position until the identical data is interrupted.
**However, attempting to fill too large an area will fail (it will be interrupted partway).
**
● Parameter Edit Pen 
Edits the data at the cursor position.
However, you can do the same with a right double-click without bothering to change the pen…
Special Operations in the Stage Window
Special operations in the stage window (operations unique to the stage window) are as follows:
・Mouse left click … Places data according to the pen.
・Mouse right click … Selects the data at the cursor position as the next data to place (eyedropper function). Right-dragging allows selecting multiple data.
・Mouse right double-click … Edits the selected data.
・Mouse wheel … Scrolls the stage horizontally or vertically. Scroll direction can be changed in “Stage Options”.
・Space key … Switches palette mode. In order: Block → Character → Item → Block → …
・Shift key (+ mouse left or right button) … Performs operations on blocks and characters and items, regardless of palette mode.
・Mouse right drag + “D” … Cuts the selected data.
・Mouse right drag + “R” … Flips the orientation of the selected character.
・Mouse right drag + “Q” … Deletes the selected data.
・Arrow keys … Scrolls the stage.
・Home・End … Scrolls the stage horizontally by one screen unit.
・PageUp・PageDown … Scrolls the stage vertically by one screen unit.
Palette Editing
Common palettes can be edited in the common palette window, and stage palettes can be edited in the stage palette window.
Common Palette Window
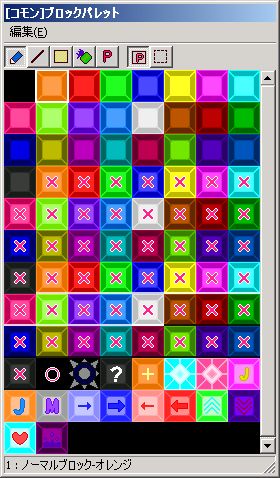
The status bar at the bottom of the palette window displays the number and name of the currently selected data.
● Menu “Edit”
Explanation of the “Edit” menu in the palette window.
・Change Data Count … Changes the number of data in the palette.
・Move Data … Allows moving or deleting data in the palette.
● Palette Edit Mode (Button on the right of the toolbar)
You can switch palette edit modes by clicking the two buttons on the right side of the toolbar in the palette window.
Palette Edit Mode Toolbar

The types of palette edit modes are as follows:
○ Parameter Edit Mode 
Right-clicking on data in the palette allows you to edit that data.
○ Menu Mode 
Right-clicking on data in the palette displays a pop-up menu.
From that menu, you can perform “Edit,” “Copy,” “Paste,” “New Insert,” etc.
From version 8.76, you can also copy placed blocks, characters, and items with a right-click (and “paste” them into the palette).
By the way, the settings for new data created with “Change Data Count” or “New Insert” can be changed in Main Menu “Project” > “Project Options”.