“Project” > “System” Table of Contents
“1” Tab
The “1” tab is where you configure general game settings.
System Settings Window “1” Tab
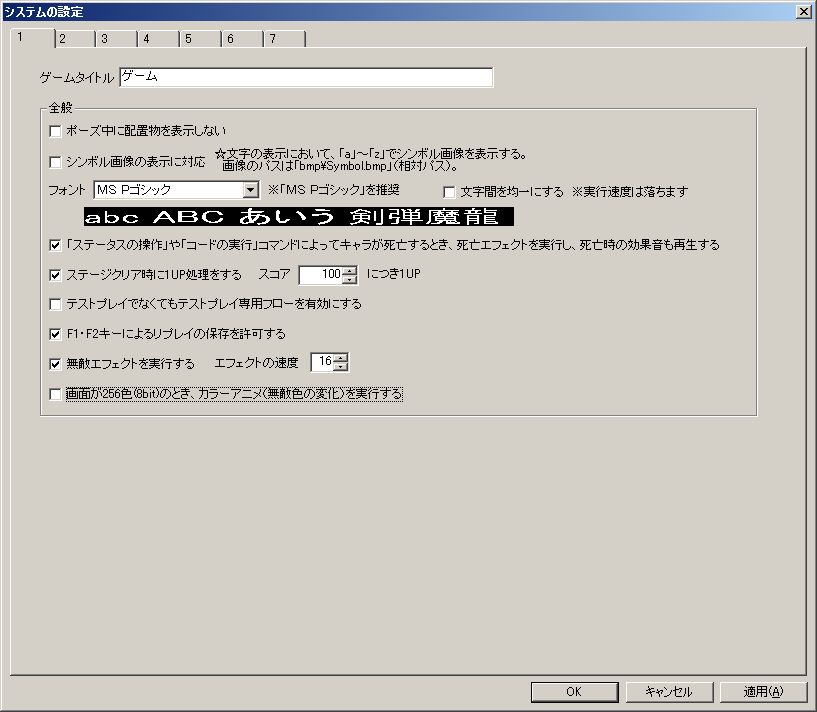
● Game Title
This will be the title of the game window.
When playing in windowed mode, the game title set here will be displayed in the title bar.****
● Space key for pause (pauses and calls up menu) Replay mode cannot turn off pause
Whether pressing the space key in the action part pauses the game and calls up the pause menu.
However, even if this is unchecked, the pause function cannot be turned off in replay mode. This is a deliberate specification because the replay mode’s pause menu options “Next Replay,” “Previous Replay,” and “Select Replay” are convenient.
● Do not display placed objects during pause
Whether to hide blocks, characters, items, etc., when paused with the Space key.
● Support for symbol image display
Whether to support the display of symbol images in “Message” commands and all other text displays.
The image used will be “bmp\Symbol.bmp” (relative path).
Regarding the display method, it uses lowercase half-width alphabets “a” through “z”.
Typing “a” will display the “sword” symbol, which is the leftmost image, “b” will display the “fire” next to it, “c” will display the “light” next to that… and so on, corresponding alphabetically from left to right.

In the default image, nothing will be displayed even if you input “n” or later.
● Font
The type of font used for all text displays.
”MS P Gothic” is recommended… this is because in Action Editor 4, text display positions and spacing are adjusted on the premise that the font is “MS P Gothic”.
Also, the Action Editor 4 author has not properly tested with fonts other than “MS P Gothic”.
”Decoration” allows you to add shadows and borders, but this may slightly reduce execution speed (potentially making it heavier).
If the text display position or spacing is incorrect, enabling “Even out character spacing in text display” might improve it, but it can also have the opposite effect. For “MS P Gothic,” display position and spacing are already adjusted independently of this setting, so it is not recommended.
● Even out character spacing in text display
Whether to even out character spacing in text display.
With the default “MS P Gothic” setting, there’s little difference or it might even worsen, but it might be effective with other fonts.
● Minimum damage reducible by defense power
Damage received from character collisions or shots can be reduced by defense power, but you can change the minimum damage reducible here.
For example, if you want to ensure at least 1 damage is taken regardless of defense power, change this item to 1.
You can also specify it as a percentage of the “power” set for characters and shots, but be aware that decimal places are truncated. For example, if it’s 10%, a character with 25 defense power receiving a shot with 25 power will actually take 2 damage.
If the power is a negative number, HP will be restored, but this lower limit setting will not apply.
This setting applies to both allies and enemies.
● Minimum impact reducible by impact resistance (hbl)
The impact received from character collisions or shots can be reduced by impact resistance, but you can change the minimum impact reducible here.
For example, if you want to ensure at least 1 (hbl) knockback occurs regardless of impact resistance, change this item to 1.
You can also specify it as a percentage of the “impact” set for characters and shots, but be aware that decimal places are truncated. For example, if it’s 10%, a character with 25 impact resistance receiving a shot with 25 impact will actually receive 2 (hbl) impact.
Even if the impact is a negative number (pulling in), the sign of the lower limit value will be reversed and applied.
This setting applies to both allies and enemies.
● When a character dies due to “Status Manipulation” or “Code Execution” commands, execute death effect and play death sound effect
When a character dies due to HP dropping to 0 or below from “Status Manipulation” or “Code Execution” commands, like a bomb in the default common palette, normally no death effect or sound effect is played. Checking this option will enable them.
● Perform 1UP processing when stage is cleared
Whether to perform 1UP processing based on score.
● Enable test play-only flow even if not in test play
Whether to execute the character’s “test play-only flow” even when not in test play.
● Allow replay saving
Whether to allow automatic replay saving and manual replay saving via F1/F2 keys, which can be set in options mode.
*Automatic saving does not occur during test play.
For details on the replay feature, refer to About Replay.
● Allow manual replay saving with F1/F2 keys
Whether to allow saving replays using the F1 and F2 keys.
If you only want to allow automatic replay saving, uncheck this option.
● Replay file name composition
The composition of replay file names.
You can choose from the following two types, the only difference being whether the file name includes [Stage Filename] or [Stage Name].
・[Year]_[MonthDay]_[HourMinuteSecond]_[StageFilename]_[VariationVariableNumber]_[VariationValue]_[StageClearedBoolean]
・[Year]_[MonthDay]_[HourMinuteSecond]_[StageName]_[VariationVariableNumber]_[VariationValue]_[StageClearedBoolean]
The actual replay file name created will look something like “2019_0430_193620_StageFileName_c001_0_CLEAR_.rpl4_*”.
● When selecting files in Free Mode and Replay Mode, and when manually saving replays, use the Explorer-style file selection dialog from versions 9.30 and earlier.
The UI and specifications for file selection changed significantly between versions 9.30 and earlier and version 9.50 and later.
Checking this item allows you to revert to the behavior of versions 9.30 and earlier.
However, it is not recommended as it does not support replay playlists (the “Replay Playback Order” in option mode) and has some minor bugs.
Specifically, when in fullscreen mode (“WindowMode=0” in “System.ini”) and the file selection dialog is open, switching applications with Alt+Tab etc. may prevent normal restoration.
Also, while not a bug, when playing multiple works, the initial folder of the file selection dialog may sometimes be the replay folder (“rpl4”) or stage folder (“stg4”) of the previously played work.
Although the Explorer-style file selection dialog from 9.30 and earlier has benefits such as supporting subfolders, for players unfamiliar with Action Editor 4’s specifications, 9.50 and later might be easier to understand, and playback with replay playlists is more comfortable.
● Execute invincible effect
Whether to execute the “Invincible Effect” for characters in Direct3D mode.
Increasing “Effect Speed” shortens the execution time of one invincible effect.
● When screen is 256 colors (8bit), execute color animation (invincible color changes rapidly)
Whether to execute color animation (invincible color changes rapidly) when in DirectDraw mode and the screen is 256 colors (8bit).
● Character drawing type
The drawing type for characters in the action part.
There are two types: “Speed Priority” and “Compatibility Priority”. “Speed Priority” is only effective in Direct3D mode.
○ Speed Priority
Drawing speed may improve (become lighter) compared to “Compatibility Priority” as the number of characters on screen increases.
However, this also depends on character data settings and circumstances.
Conversely, when there are few characters on screen, it might be slightly slower than “Compatibility Priority”.
A disadvantage of “Speed Priority” is that the depth relationship of characters (Z-coordinate, foreground or background) may differ from versions 8.54 and earlier (≈ “Compatibility Priority”).
In particular, when some character effects are executed, characters with the same “Z-coordinate” will be displayed at the very back, which is a specification. (It can be somewhat controlled by adjusting the character’s “Z-coordinate” setting.)
○ Compatibility Priority
The same drawing type as versions 8.54 and earlier.
This is also the initial setting when migrating data from versions 8.54 and earlier.
“2” Tab
The “2” tab is where you configure settings for each game mode.
System Settings Window “2” Tab
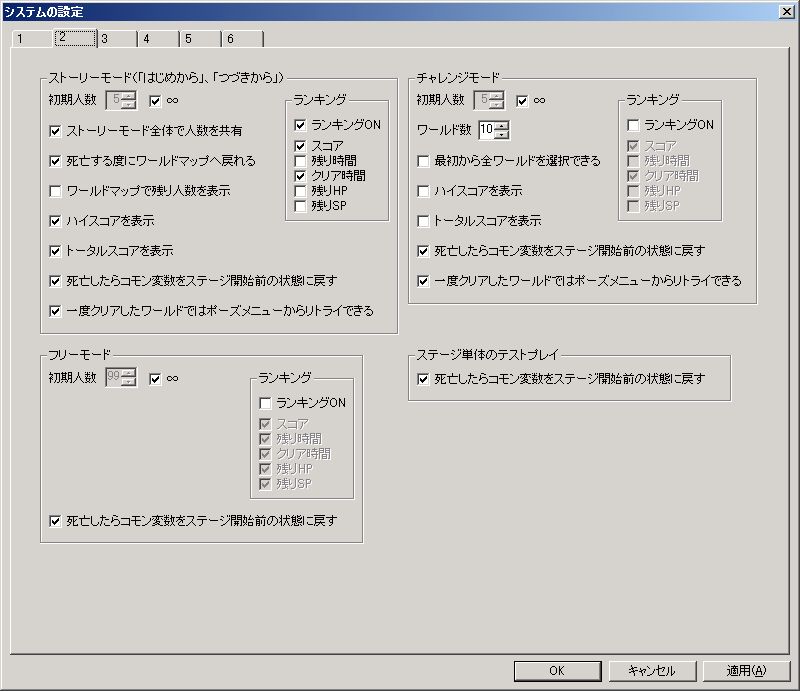
● Initial Lives
Initial lives for each game mode.
By the way, the number displayed in the status window at the top of the stage is “remaining lives”, so it’s the value of (number of lives - 1). (This is not a bug where the number of lives is one less than set here).
● Share lives across Story Mode (Configurable only in Story Mode)
If checked, the number of lives (remaining lives) upon clearing a world will be carried over to the next world.
If unchecked, the number of lives will reset to “Initial Lives” before the start of each world.
● Return to World Map upon each death (Configurable only in Story Mode)
If checked, a menu will appear allowing you to choose between “Retry” or “Return to Map” each time you die.
If unchecked, it will automatically “Retry”.
● Display remaining lives on World Map (Configurable only in Story Mode)
Whether to display remaining lives in the top right corner of the World Map.
● All worlds selectable from the start (Configurable only in Challenge Mode)
Whether all worlds in Challenge Mode can be played from the beginning.
● Display high score (Configurable only in Story Mode and Challenge Mode)
Whether to display the high score.
● Display total score (Configurable only in Story Mode and Challenge Mode)
Whether to display the total score.
Total score is the sum of scores from all worlds.
● Revert common variables to state before stage start upon death
For Story Mode, this means “revert common variables to state before stage start upon death or returning to world map without clearing stage.”
Whether to revert common variables to their state before the stage started when dying.
If unchecked, common variable values will not revert upon death, allowing for the implementation of stage checkpoints and similar features depending on how you use it.
● Retry from pause menu in worlds that have been cleared once (Configurable only in Story Mode and Challenge Mode)
Whether you can retry from the pause menu (Space key) at any time in worlds that have been cleared once.
● Return to map from pause menu in worlds that have been cleared once (Configurable only in Story Mode)
Whether you can return to the map from the pause menu (Space key) at any time in worlds that have been cleared once.
● Auto-save initial settings
Initial settings for the auto-save function executed when “Start New Game” is selected.
・Start game with auto-save OFF … Saving to an arbitrary location and switching to auto-save ON is done from the World Map menu.
・Select save destination and start with auto-save ON … A window for selecting the save destination will appear immediately after selecting “Start New Game”. Since it starts with auto-save ON, there’s no need to worry about forgetting to save.
・Save destination fixed to #1, auto-save always ON … The save destination selection window will not appear, the save destination will be fixed to file #1, and auto-save will always be ON. On the title screen, if no save data exists, only “Start New Game” will be displayed and “Continue” will be hidden. Conversely, if save data exists, only “Continue” will be displayed. Also, the “Save” and “Auto-save” commands will no longer be displayed in the World Map menu.
● Auto-save upon clearing each stage in multi-stage worlds (Configurable only in Story Mode)
Whether to perform auto-save each time a stage is cleared in worlds composed of multiple stages.
This is only effective when “Auto-save ON” is set in the World Map menu.
Even if the auto-save setting for the “Stage Clear” command is disabled, this setting takes precedence, so auto-save will occur.
● Ranking (Frame)
Whether to enable rankings for each genre.
Rankings will not function unless the ranking settings for the stage (Main Menu “Stage” > “Stage Settings” > “Basic Settings” tab “Ranking”) are also enabled.
If “Ranking ON” is unchecked, the ranking window itself will not be displayed.
“3” Tab
The “3” tab is where you configure stock and material settings.
System Settings Window “3” Tab
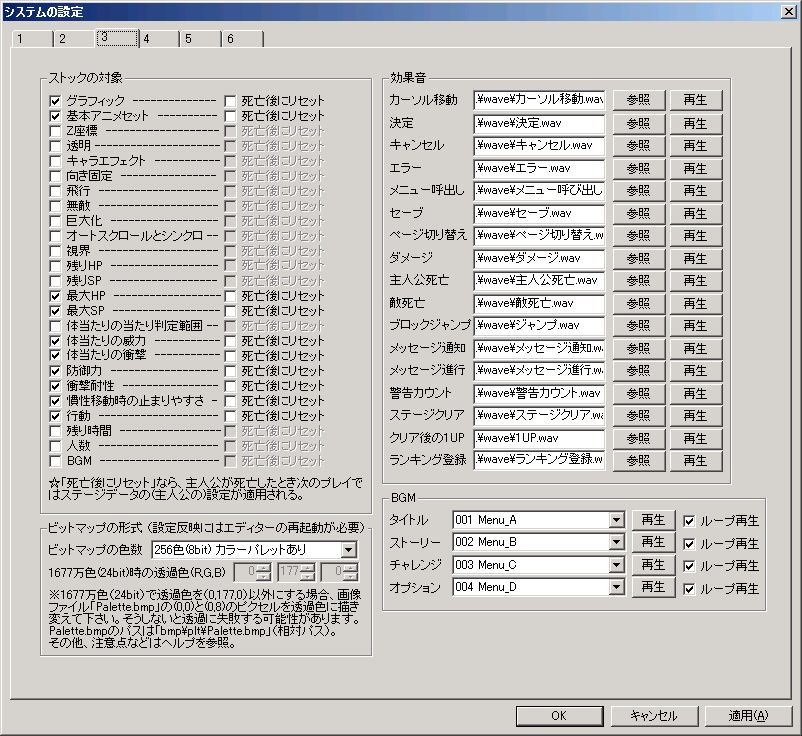
● Stock Target (Frame)
Which stats to stock.
If “Reset after death” is checked, stat inheritance from stock will be disabled in the (next) playthrough after the protagonist dies once, and instead the protagonist’s settings from the stage data will be applied.
● Bitmap Color Depth
Action Editor 4 supports two bitmap formats: 256 colors (8-bit) and 16.77 million colors (24-bit).
Specify which format of bitmap to use here, and unify all images in the “bmp” folder (except “palette.bmp” and “palette2.bmp”) to that format.
16.77 million color (24-bit) bitmaps have no color restrictions due to a color palette, making them easier to draw with than 256-color (8-bit) bitmaps, but they have the drawbacks of larger file sizes and slightly slower loading times.
For bitmap standards, refer to “Image Standards”.
Also, when using 256-color (8-bit) bitmaps, you can launch in 8-bit screen mode in DirectDraw mode, but when using 16.77 million color (24-bit) bitmaps, you cannot launch in 8-bit screen mode even in DirectDraw mode.
In Action Editor 4, the available features and performance vary greatly depending on whether the screen mode is 8-bit or otherwise.
※8-bit screen mode is only supported in DirectDraw mode (creating with 8-bit screen mode as the main focus is not recommended). DirectDraw mode has poor compatibility with OS versions Windows Vista and later and some video cards, potentially causing issues such as slow performance, screen tearing, or transparency not being rendered in some cases.
<Features in 8-bit screen mode>
・Low video memory (VRAM) and system memory usage.
・“Color change”, “transparency”, “mosaic”, “blur” in character effects, and “mosaic” in screen effects execute faster but with poor precision (look rough).
・Cannot be executed in windowed mode.
・Cannot be executed in Direct3D mode.
<Features in 16-bit/32-bit screen mode>
・Invincible color animation is disabled.
・Colors do not change with the “Color” option.
・The “Change Screen Color” command for characters and items is disabled in DirectDraw mode.
・High video memory and system memory usage. Used more in the order of 32-bit > 16-bit > 8-bit. Especially in Direct3D mode, a lot of video memory is used.
※In Direct3D mode, if video memory runs out, not only does performance slow down, but problems can occur with font rendering. It is desirable for the execution environment to have 256MB or more of video memory.
・“Color change”, “transparency”, “mosaic”, “blur” in character effects, and “mosaic” in screen effects execute slower but with good precision (look clean). In Direct3D mode, “Color change” and “transparency” are fast.
It’s quite complicated due to the drawing modes (Direct3D, DirectDraw), but the above differences are important.
For explanations of drawing modes, please refer to the environment configuration file “System.ini”.
● Transparency Color (R,G,B) for 16.77 million colors (24bit)
The transparency color for images when “16.77 million colors (24bit)” is specified for “Bitmap Color Depth”.
*If you want to set the transparency color to something other than (0,177,0), please repaint the pixels at (0,0) and (0,8) in the “Palette.bmp” image file to your desired transparency color. Otherwise, transparency may fail. The path to “Palette.bmp” is “bmp\plt\Palette.bmp” (relative path).
● Sound Effects (Frame)
Sound effects (wave) to be played throughout the game.
Please specify sound effects from the “wave” folder. (If using your own sound effects, place them in the “wave” folder.)
・Page Switch … Plays when switching genres with the V key while viewing rankings.
・Block Jump … Plays when landing on a jump block (a block with “Action” set to “Jump”).
・Warning Count … In stages with a time limit, when the time is below “Warning Sound Start Time”, it plays every second.
● BGM (Frame)
BGM to be played in each scene.
Can be specified from the BGM set in the database.
“4” Tab
The “4” tab is where you configure the status window and menu settings.
System Settings Window “4” Tab
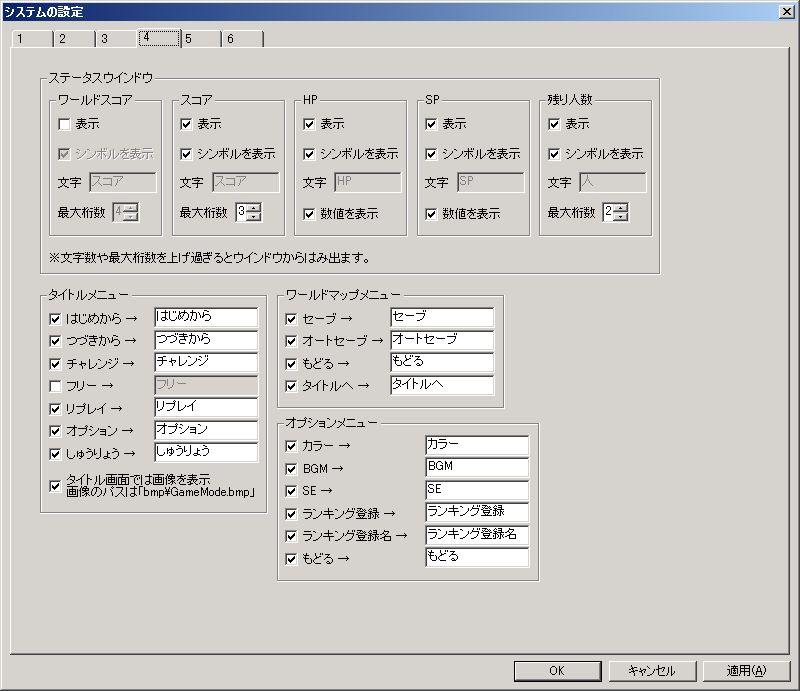
● Status Window (Frame)
Settings for the status window displayed at the top of the stage.
In the status window, “World Score” → “Score” → “HP” → “SP” → “Remaining Lives” are displayed from left to right.
○ Display
Whether to display the status.
○ Display Symbol
Whether to display status using symbol images.
Symbol images from “bmp\Accessory.bmp” (relative path) at (0,32) to (79~47) are used.
○ Text
The text to display if symbol images are not used for status.
If the number of characters is too large, the status will overflow the window.
○ Max Digits (Configurable only for “World Score”, “Score”, “Remaining Lives”)
The maximum number of digits for the status.
If the current status value exceeds the maximum number of digits, it will not be displayed correctly.
Increasing the maximum number of digits too much will cause the status to overflow the window.
○ Display Number (Configurable only for “HP”, “SP”)
Whether to display numbers within the HP and SP bars.
○ Conditions for HP and SP Bar Color Change Common to Protagonist and Enemies (Frame)
At what remaining HP or SP (or percentage) the bar color changes.
With the default image (“bmp\Accessory.bmp”), the bar changes to red.
This setting applies not only to the bars in the status window but also to the bars displayed above the protagonist or enemies when they take damage.
● Title Menu (Frame)
Whether to enable (display) each command in the title menu.
You can also change the name of each command.
If “Display image on title screen” is checked, an image will be displayed instead of text.
The image path will be “bmp\GameMode.bmp” (relative path).
● World Map Menu (Frame)
Whether to enable (display) each command in the world map menu.
You can also change the name of each command.
● Option Menu (Frame)
Whether to enable (display) each command in the option menu.
You can also change the name of each command.
”Color” is an option only effective in DirectDraw mode with a 256-color (8-bit) screen.
Keeping each command’s name within 8 characters will keep the option menu layout tidy.
If you check “Display Description” and edit the description text using the “Edit Description” button, that description will be displayed in the space at the bottom of the option mode screen.
Note that if you want to change the default option settings when distributing the game, do not delete the entire “user_data” folder where the game’s save data files are located. Instead, set the desired default options, then delete all files in the “user_data” folder EXCEPT “Option.dat” (and then distribute that).
“5” Tab
The “5” tab is where you configure terminology settings.
System Settings Window “5” Tab
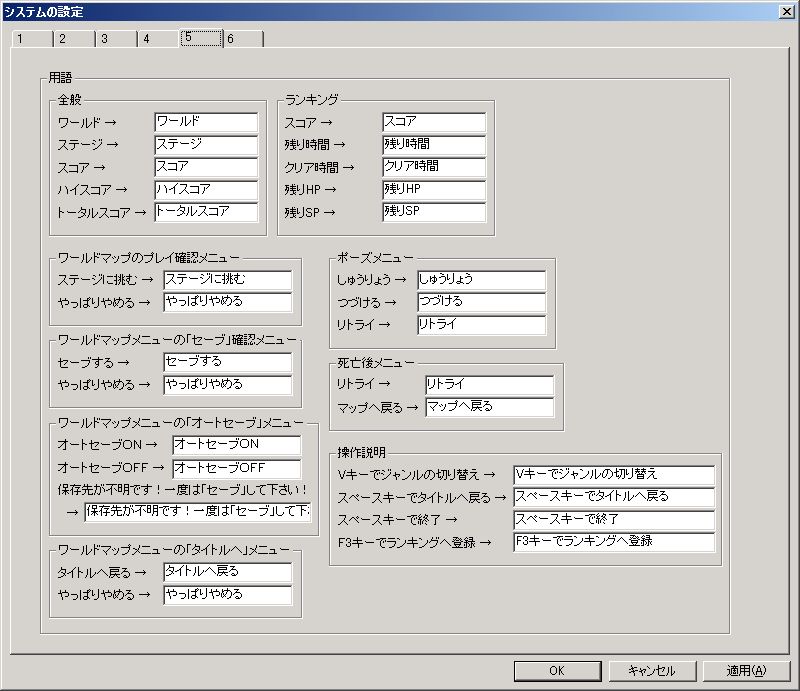
● Terminology (Frame)
Terms and sentences used in the game.
You can change them here.
“6” Tab
The “6” tab is where you configure “System.ini” settings.
System Settings Window “6” Tab
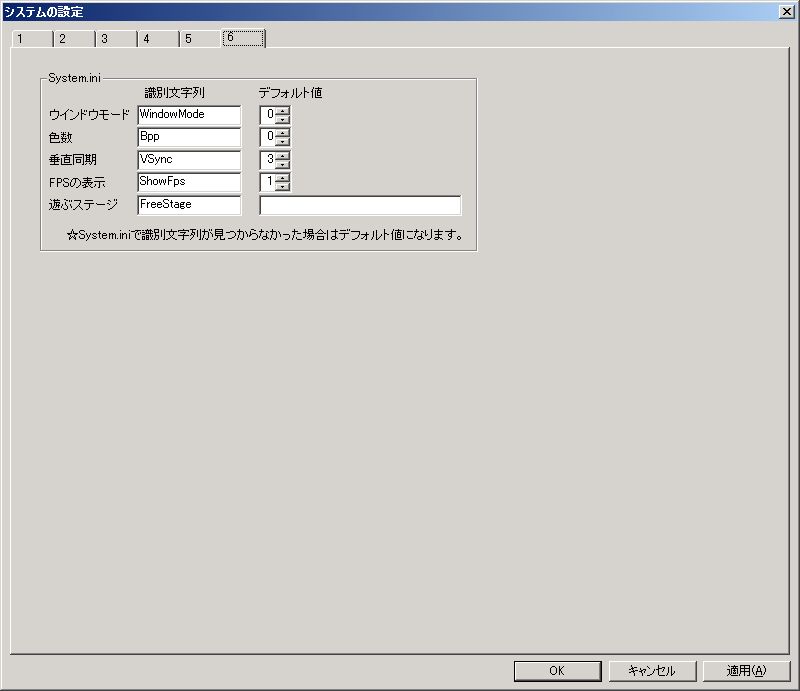
● System.ini (Frame)
Settings for the environment configuration file “System.ini”.
Explanations for each item are provided within “System.ini”.
The program reads data (characters) from “System.ini” sequentially from top to bottom until the “Exit” line is found.
If an “identification string” is not found before the “Exit” line is read, that item will use its “default value”.
For example, if you want to prohibit DirectDraw as the rendering mode, set the “default value” of “UseDirect3D” in the database to “1”, and then delete the line “Direct3D=1” in “System.ini”.
○ Actual color depth when “Screen Color Depth (Bpp)” is “0” in fullscreen (Frame)
The screen color depth when “Bpp=0 (recommended setting)” is specified in “System.ini” for fullscreen mode.
Specifically, if the default settings result in Direct3D mode being 32-bit while DirectDraw mode is 8-bit (256 colors), and this is an issue, please change DirectDraw mode to 32-bit as well.
*If you change this setting, it’s advisable to also correct the explanation for “Bpp=0” in System.ini.
○ Move to title after clearing this stage
If the path to a stage file is set in “System.ini” for “FreeStage=”, whether to move to the title screen after clearing that stage.
This allows for opening cinematic sequences and the like.
However, this stage will be skipped during test play.
If this setting is enabled, the ranking feature will be disabled only for the stage specified by the path.
“7” and Subsequent Tabs
Tabs from “7” onwards configure compatibility settings.
Please check these if you specifically want to use the behavior of older versions (which generally contain bugs).
**If you want to know more about the behavior of older versions, the “Update History” on the Action Editor 4 download page might provide hints. It may not always be detailed enough to be helpful.
For example, if you want to know the behavior before version 2.12, check the update history for the version immediately after 2.12.
**
System Settings Window “7” Tab
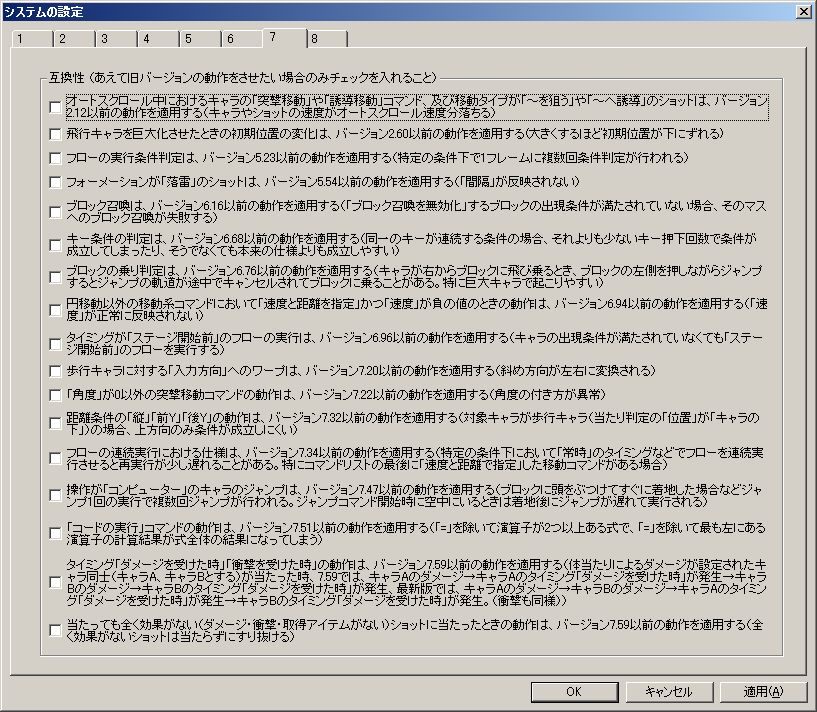
● For characters’ “Charge Move” and “Guided Move” commands, and for shot movement types “Targeting ~” and “Guiding to ~” during auto-scrolling, apply behavior from versions 2.12 and earlier (character and shot speed reduced by auto-scroll speed)
Check this only if you specifically want to apply the behavior from versions 2.12 and earlier, such as when migrating data from those versions.
● For initial position changes when giant flying characters are created, apply behavior from versions 2.60 and earlier (initial position shifts downward as size increases)
Check this only if you specifically want to apply the behavior from versions 2.60 and earlier, such as when migrating data from those versions.
● For flow execution condition evaluation, apply behavior from versions 5.23 and earlier (conditions are evaluated multiple times per frame under specific conditions)
Check this only if you specifically want to apply the behavior from versions 5.23 and earlier, such as when migrating data from those versions.
(Omitted)