“Project” > “Database” Table of Contents
A database is data shared across all stages.
Updating the database may affect multiple stages, so please update carefully.
※Similar to common palettes, the referencer (e.g., character’s “Basic Animation Set”) only holds the database number, so if data is deleted or reordered, changing the database number, the referenced data will also be swapped.
- Basic Animation Set
- Animation
- Character Specific BMP
- Sword Type
- Effect
- Character Effect
- Screen Effect
- Picture
- Sound Effect
- BGM
- World Chip
Basic Animation Set
A basic animation set is a collection of animations for several basic states of a character.
Database Window “Basic Animation Set” Tab
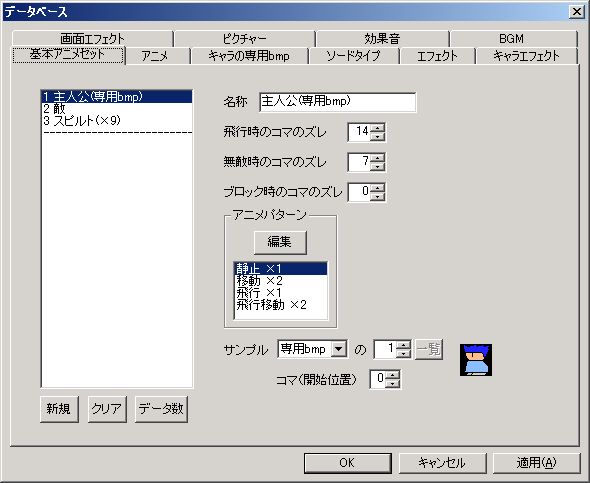
Explanation of each item:
● Name
The name displayed in the editor.
● Frame Offset when Flying
The frame offset when the character is in a flying state.
If flying graphics are prepared, like for the default protagonist (character-specific bmp #1), different graphics can be displayed for walking and flying.
● Frame Offset when Invincible
The frame offset when the character is in an invincible state.
If invincible graphics are prepared, like in the default image, different graphics can be displayed for non-invincible and invincible states.
● Frame Offset when Blocking
The frame offset when the character is in a blocking state.
If blocking character graphics are prepared, like in the default image, different graphics can be displayed for non-blocking and blocking states.
● Animation Pattern (Frame)
Animations for each state: “Still”, “Moving”, “Flying”, “Flying Moving”.
Each can be edited with the “Edit” button.
Animation Pattern Settings Window
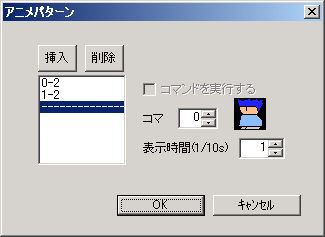
○ Animation List
The list on the left side of the window is the animation list.
Animations are executed in order from the top of the list.
○ Frame
Which frame graphic to display.
○ Display Time (1/10s)
The time for which the graphic set in “Frame” is displayed.
● Sample
You can confirm the animation with the character graphic set here.
This has no effect on the game.
Animation
Animation refers to character animations.
Database Window “Animation” Tab
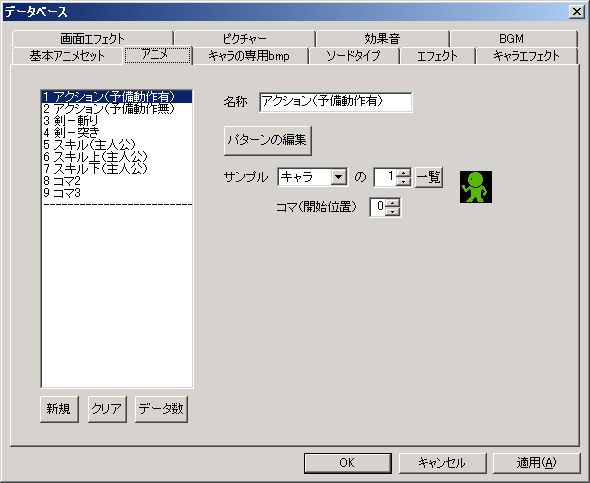
Explanation of each item:
● Name
The name displayed in the editor.
● Edit Pattern (Button)
Pressing the “Edit Pattern” button allows you to set animations.
Animation Pattern Settings Window
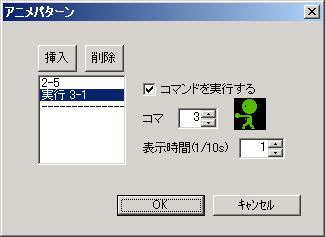
○ Animation List
The list on the left side of the window is the animation list.
Animations are executed in order from the top of the list.
○ Execute Command
This affects commands other than “Execute Animation” that can set animations, such as “Straight Move” or “Shot” (almost all character-specific commands).
**While these commands are executing, only the single “Frame” checked as “Execute Command” will be continuously displayed.
**For example, even if you specify a two-frame walking animation for “Straight Move”, only the frame checked as “Execute Command” will be shown, so you cannot display the walking motion. If you absolutely need to do this, it requires some effort and ingenuity, but it’s best to change the basic animation set or use the “Execute Animation” command as a substitute.
Data before (above in the animation list) the data checked as “Execute Command” will animate before the command is executed.
This allows you to express preparatory actions before command execution, such as “bracing before firing a shot.”
However, for the preparatory animation to play from start to finish, you need to set a command (e.g., “Wait”) before the relevant command for a duration longer than or equal to the preparatory action time.
Here are three examples.
In all examples, the default animation “Action (with preparatory action)” is specified for the “Shot” command.
・“Action (with preparatory action)” Settings
Execute Command: OFF Frame: 2 Display Time (1/10s): 5 ← Preparatory action part
↓
Execute Command: ON Frame: 3 Display Time (1/10s): 1
・[Flow B]
Command: “Wait” Execution Time: 5
Command: “Shot” Execution Time: 1 Animation: “Action (with preparatory action)”
・[Flow C]
Command: “Straight Move” Execution Time: 5
Command: “Shot” Execution Time: 1 Animation: “Action (with preparatory action)”
Of these three flows, the preparatory action animation will only be executed in Flow B and Flow C, where a command with a duration equal to or longer than the preparatory action time is set before the “Shot” command.
○ Frame
Which frame graphic to display.
○ Display Time (1/10s)
The time for which the graphic set in “Frame” is displayed.
● Sample
You can confirm the animation with the character graphic set here.
This has no effect on the game.
Character Specific BMP
Character specific BMP refers to a bitmap file containing only one character.
Bitmap files are located in the “chara_sp” folder within the “bmp” folder.
If you want to add a new character specific BMP, please put it in this folder.
The bitmap size is free for both width and height (for versions 9.85 and below, width was fixed at 512). However, please make both width and height a multiple of 32.
Character specific BMPs also support giant characters (4x to 100x). You can refer to the default image “Enemy01_009.bmp” for reference.
Now, let’s explain each item.
● Name
The name displayed in the editor.
● Path
The path to the bitmap.
Please specify as a relative path.
● Giant Character
Whether the bitmap is for a giant character (4x to 100x), and if so, how many times larger than normal.
Sword Type
Sword type is data set using the “Sword” command.
This determines the sword’s graphics and hit detection range.
**Sword bitmap files are located in the “sword” folder within the “bmp” folder.
If you want to add new sword bitmaps, please put them in this folder.
**
Database Window “Sword Type” Tab
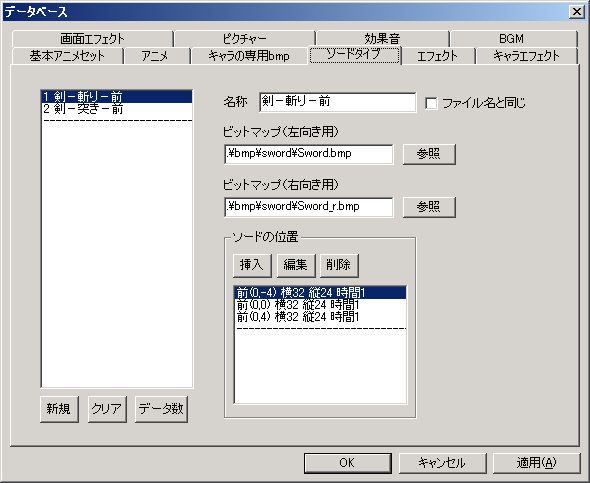
Explanation of each item:
● Name
The name displayed in the editor.
● Bitmap (Left-facing)
The path to the bitmap for the left-facing sword.
Please specify as a relative path.
● Bitmap (Right-facing)
The path to the bitmap for the right-facing sword.
Please specify as a relative path.
● Sword Position (Frame)
This determines the sword’s position, width, and animation.
In the game, they are executed in order from the top of the list.
Pressing the “Insert” or “Edit” button displays a window for setting the sword’s position.
Sword Position Settings Window
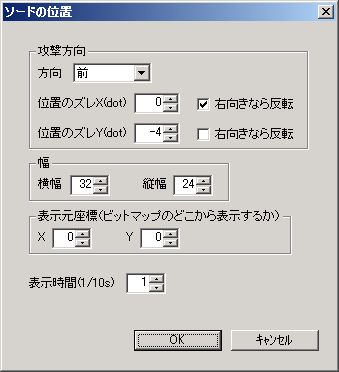
○ Direction
The direction the sword appears.
This determines the sword’s basic position.
When “Front” or “Back”, the sword’s vertical position will be the same as the character’s center.
When “Up” or “Down”, the sword’s horizontal position will be the same as the character’s center.
However, the sword’s orientation (whether the bitmap is left-facing or right-facing) will always be the same as the user’s orientation.
○ Position Offset X (dot)
○ Position Offset Y (dot)
The distance to offset from the sword’s original position.
This can be used to express actions like “swinging down a sword.”
○ Width
○ Height
The width of the bitmap to display.
Also, this is the sword’s hit detection range.
○ Display Source Coordinates (Where to display from the bitmap)
Set the top-left coordinates of the area you want to display in the bitmap.
○ Display Time (1/10s)
The active duration of the sword.
Effect
Effect is a feature that displays arbitrary images with animation.
**Effect bitmap files are located in the “effect” folder within the “bmp” folder.
If you want to add new effect bitmaps, please put them in this folder.
**
**All effect images are loaded immediately after the game starts.
Creating a large number of effects or setting large images will slow down game startup, and those images will occupy memory until the game ends, potentially significantly reducing performance depending on the environment.
However, as long as an excessive number of large images are not set, there should be no problem.
**
Database Window “Effect” Tab
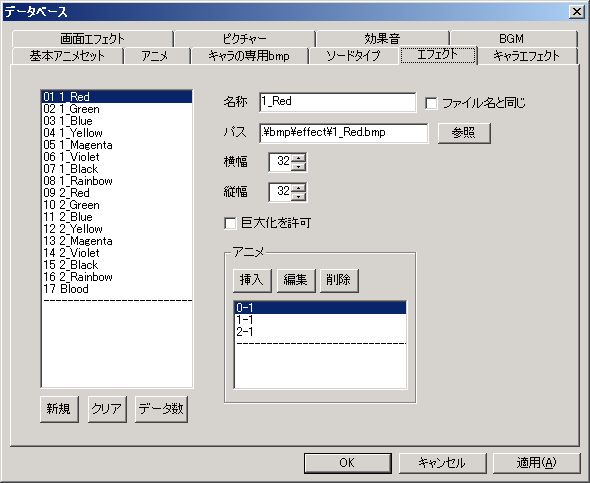
Explanation of each item:
● Name
The name displayed in the editor.
● Path
The path to the bitmap.
Please specify as a relative path.
● Width
● Height
The width of one frame to display.
● Allow Scaling
If this is checked, the effect will be displayed at the same magnification as its origin.
For example, if an effect is set to a shot that is 4 times the normal size, the effect generated when the shot hits will also be displayed at 4 times the size, the same magnification as the shot.
● Animation (Frame)
The animation of the effect.
In the game, they are executed in order from the top of the list.
Pressing the “Insert” or “Edit” button displays a window for setting the animation.
Effect Animation Settings Window
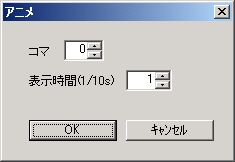
○ Frame
Which frame to display.
From the bitmap, the area defined by “Width” and “Height” will be displayed starting from the coordinates ( “Frame” × “Width”, 0).
○ Display Time (1/10s)
The time for which the effect is displayed.
Character Effect
Character effect refers to visual effects applied to a character’s graphics.
Database Window “Character Effect” Tab
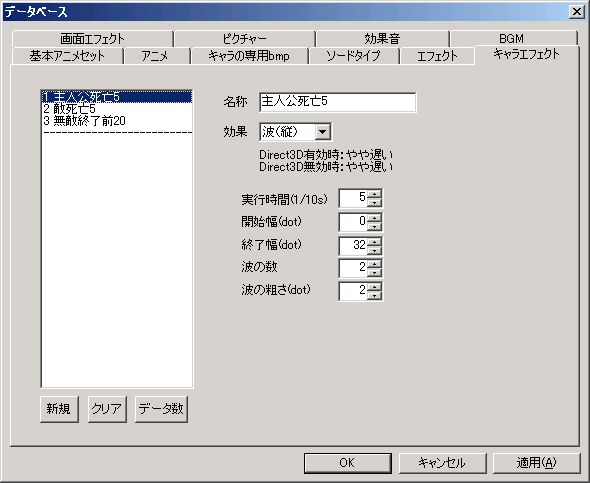
Explanation of each item:
● Name
The name displayed in the editor.
● Effect
The type of character effect.
Depending on the selected character effect, the description text immediately below “Effect” and the settings other than “Execution Time (1/10s)” will change.
The description text mainly displays the execution speed (light or heavy), but the execution speed varies depending on the character effect settings and execution environment, so please consider it as a reference.
Specific items for each character effect are explained below.
○ Burst
If “Start Position” < “End Position”, the image, divided into 4 parts from the character’s center, gradually moves away from its original position.
If “Start Position” > “End Position”, the image, divided into 4 parts from the character’s center, gradually moves closer to its original position.
The movement speed of the divided images will be {(“End Position” - “Start Position”) ÷ “Execution Time”}.
・Start Position (dot) … The distance from the center of the original image to the 4 divided images at the start of the effect. If “0”, it’s the state before division (normal display).
・End Position (dot) … The distance from the center of the original image to the 4 divided images at the end of the effect.
○ Split (Horizontal)
○ Split (Vertical)
If “Start Position” < “End Position”, the image, split horizontally or vertically, gradually moves away from its original position.
If “Start Position” > “End Position”, the image, split horizontally or vertically, gradually moves closer to its original position.
The movement speed of the divided images will be {(“End Position” - “Start Position”) ÷ “Execution Time”}.
・Start Position (dot) … The distance from the original image’s position to the divided image at the start of the effect. If “0”, it’s the state before division (normal display).
・End Position (dot) … The distance from the original image’s position to the divided image at the end of the effect.
・Number of Splits … How many parts to divide the image into.
○ Wave (Horizontal) (When Direct3D is disabled: slightly slow)
○ Wave (Vertical) (When Direct3D is disabled: slightly slow)
If “Start Width” < “End Width”, the character will undulate horizontally or vertically, and the waves will gradually get larger.
If “Start Width” > “End Width”, the character will undulate horizontally or vertically, and the waves will gradually get smaller.
The speed at which the wave size changes will be {(“End Width” - “Start Width”) ÷ “Execution Time”}.
・Start Width (dot) … The size of the wave at the start of the effect.
・End Width (dot) … The size of the wave at the end of the effect.
・Number of Waves … The number of waves.
・Wave Roughness (dot) … A higher value makes the wave shape more jagged, but increases execution speed.
○ Flicker (When Direct3D is enabled: fast. When Direct3D is disabled: fast)
The character flickers.
・Flicker Interval (1/60s) … The interval of flickering.
○ Rotate A (When Direct3D is enabled: same as Rotate B. When Direct3D is disabled: performance-oriented for giant characters)
○ Rotate B (When Direct3D is enabled: same as Rotate A. When Direct3D is disabled: slightly slow. Drawing precision-oriented for giant characters)
If “Start Angle” < “End Angle”, the character rotates clockwise.
If “Start Angle” > “End Angle”, the character rotates counter-clockwise.
For example, if “Start Angle” is “0” and “End Angle” is “720 (360×2)”, the character rotates twice clockwise.
The rotation speed will be {(“End Angle” - “Start Angle”) ÷ “Execution Time”}.
・Start Angle … The inclination of the image at the start of the effect.
・End Angle … The inclination of the image at the end of the effect.
○ Rotate (Depth)
The character rotates towards the back (appears to be rotating).
**For block or item graphics, the program does not store images of the back side (the program does not flip block or item images internally), so performing “Rotate (Depth)” on asymmetrical block or item graphics will not make them appear to rotate.
**A difference of “64” between “Start Position” and “End Position” results in approximately one rotation.
The rotation speed will be {(“End Position” - “Start Position”) ÷ “Execution Time”}.
・Start Position (dot) … The inclination of the image at the start of the effect.
・End Position (dot) … The inclination of the image at the end of the effect.
○ Circle (When Direct3D is disabled: slightly slow)
The character is cut out in a circular shape.
If “Start Radius” < “End Radius”, the circle gradually gets larger.
If “Start Radius” > “End Radius”, the circle gradually gets smaller.
The speed at which the circle size changes will be {(“End Radius” - “Start Radius”) ÷ “Execution Time”}.
・Start Radius (dot) … The radius of the circle at the start of the effect.
・End Radius (dot) … The radius of the circle at the end of the effect.
・Circle Roughness (dot) … A higher value makes the circle shape more jagged, but increases execution speed.
○ Scale
If “Start Width” < “End Width”, the character gradually expands.
If “Start Width” > “End Width”, the character gradually shrinks.
The speed at which the size changes will be {(“End Width” - “Start Width”) ÷ “Execution Time”}.
・Start Width (dot) … The width of the image at the start of the effect. “32” is the normal size (same as normal display).
・End Width (dot) … The width of the image at the end of the effect.
○ Lens (When Direct3D is enabled: too slow. When Direct3D is disabled: slow)
The character is displayed as if seen through a lens.
If “Start Distance” < “End Distance”, the character’s center gradually shrinks (approaches normal display).
If “Start Distance” > “End Distance”, the character’s center gradually expands.
The speed at which the bulging changes will be {(“End Distance” - “Start Distance”) ÷ “Execution Time”}.
・Start Distance … The distance between the viewpoint and the lens at the start of the effect. “100” means the lens is flush with the character, with no change from normal display. The character’s center bulges most when “0”.
・End Distance … The distance between the viewpoint and the lens at the end of the effect.
・Offset X (dot) … Horizontal offset of the lens application position. If “0”, it’s the center of the character.
・Offset Y (dot) … Vertical offset of the lens application position. If “0”, it’s the center of the character.
○ Color Change (When Direct3D is disabled: screen is 8-bit color -> poor precision, 16-bit color or higher -> slightly slow)
Composites and displays the character’s original color with an arbitrary color.
If “Start Composite Level” < “End Composite Level”, the “Color” gradually becomes darker.
If “Start Composite Level” > “End Composite Level”, the “Color” gradually becomes lighter.
The speed at which the color changes will be {(“End Composite Level” - “Start Composite Level”) ÷ “Execution Time”}.
・Start Composite Level … The degree of composition between the character image’s original color and the color specified in “Color” at the start of the effect.
・End Composite Level … The degree of composition between the character image’s original color and the color specified in “Color” at the end of the effect.
・Color … The color to composite. Specified by the color number from Action Editor 4’s dedicated color palette.
○ Transparency (When Direct3D is disabled: screen is 8-bit color -> poor precision, 16-bit color or higher -> too slow)
The character becomes semi-transparent.
It can also flicker incidentally.
・Flicker Interval (1/60s) … The interval of flickering.
○ Mosaic (When Direct3D is disabled: slow if screen is 16-bit color or higher)
A mosaic effect is applied to the character.
If “Start Strength” < “End Strength”, the mosaic gradually becomes stronger.
If “Start Strength” > “End Strength”, the mosaic gradually becomes weaker.
The speed at which the mosaic effect changes will be {(“End Strength” - “Start Strength”) ÷ “Execution Time”}.
・Start Strength … The strength of the mosaic at the start of the effect.
・End Strength … The strength of the mosaic at the end of the effect.
○ Blur (When Direct3D is enabled: slightly slow. When Direct3D is disabled: only effective with 16-bit color or higher. Slow)
The character is displayed blurred.
If “Start Strength” < “End Strength”, the blur gradually becomes stronger.
If “Start Strength” > “End Strength”, the blur gradually becomes weaker.
The speed at which the blur effect changes will be {(“End Strength” - “Start Strength”) ÷ “Execution Time”}.
・Start Strength … The strength of the blur at the start of the effect.
・End Strength … The strength of the blur at the end of the effect.
Screen Effect
Screen effect refers to visual effects applied to the entire screen.
Database Window “Screen Effect” Tab
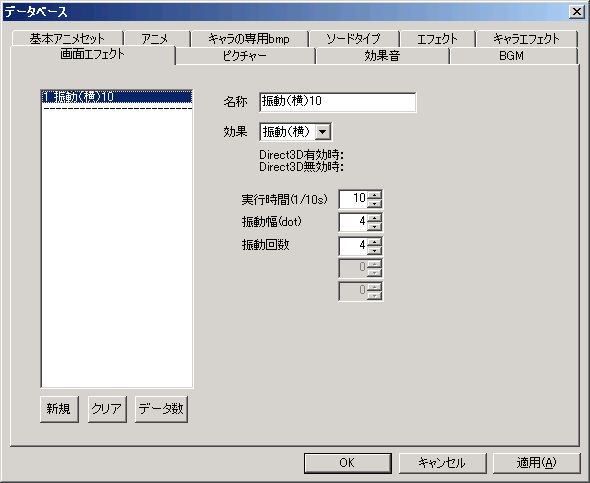
Explanation of each item:
● Name
The name displayed in the editor.
● Effect
The type of screen effect.
Depending on the selected screen effect, the description text immediately below “Effect” and the settings other than “Execution Time (1/10s)” will change.
The description text mainly displays the execution speed (light or heavy), but the execution speed varies depending on the environment, so please consider it as a reference.
Specific items for each screen effect are explained below.
○ Move
The screen moves from the start coordinates to the end coordinates.
The horizontal movement speed will be {(“End X Coordinate” - “Start X Coordinate”) ÷ “Execution Time”}.
The vertical movement speed will be {(“End Y Coordinate” - “Start Y Coordinate”) ÷ “Execution Time”}.
・Start X Coordinate (dot) … The X coordinate of the left edge of the screen at the start of the effect. This coordinate should be specified in screen coordinates (where the left edge of the screen is “0” and the right edge is “640”).
・Start Y Coordinate (dot) … The Y coordinate of the top edge of the screen at the start of the effect. This coordinate should be specified in screen coordinates (where the top edge of the screen is “0” and the bottom edge is “480”).
・End X Coordinate (dot) … The X coordinate of the left edge of the screen at the end of the effect.
・End Y Coordinate (dot) … The Y coordinate of the top edge of the screen at the end of the effect.
○ Vibrate (Horizontal)
○ Vibrate (Vertical)
The screen shakes left-right or up-down.
The vibration speed will be {(“Number of Vibrations” ÷ “Execution Time”)}.
・Vibration Amplitude … How much the screen deviates at maximum in one vibration.
・Number of Vibrations … The number of vibrations.
○ Split (Horizontal)
○ Split (Vertical)
If “Start Position” < “End Position”, the screen, split horizontally or vertically, gradually moves away from its original position.
If “Start Position” > “End Position”, the screen, split horizontally or vertically, gradually moves closer to its original position.
The movement speed of the divided screen will be {(“End Position” - “Start Position”) ÷ “Execution Time”}.
・Start Position (dot) … The distance from the original screen position to the divided screen at the start of the effect. If “0”, it’s the state before division (normal display).
・End Position (dot) … The distance from the original screen position to the divided screen at the end of the effect.
・Number of Splits … How many parts to divide the screen into.
○ Wave (Horizontal) (When Direct3D is enabled: slightly slow. When Direct3D is disabled: slightly slow)
○ Wave (Vertical) (When Direct3D is enabled: slightly slow. When Direct3D is disabled: slightly slow)
If “Start Width” < “End Width”, the screen will undulate horizontally or vertically, and the waves will gradually get larger.
If “Start Width” > “End Width”, the screen will undulate horizontally or vertically, and the waves will gradually get smaller.
The speed at which the wave size changes will be {(“End Width” - “Start Width”) ÷ “Execution Time”}.
・Start Width (dot) … The size of the wave at the start of the effect.
・End Width (dot) … The size of the wave at the end of the effect.
・Number of Waves … The number of waves.
・Wave Roughness (dot) … A higher value makes the wave shape more jagged, but increases execution speed.
○ Flicker (When Direct3D is enabled: fast. When Direct3D is disabled: fast)
Everything on the screen except the background flickers.
・Flicker Interval (1/60s) … The interval of flickering.
○ Rotate (When Direct3D is disabled: slow)
If “Start Angle” < “End Angle”, the screen rotates clockwise.
If “Start Angle” > “End Angle”, the screen rotates counter-clockwise.
For example, if “Start Angle” is “0” and “End Angle” is “720 (360×2)”, the screen rotates twice clockwise.
The rotation speed will be {(“End Angle” - “Start Angle”) ÷ “Execution Time”}.
・Start Angle … The inclination of the screen at the start of the effect.
・End Angle … The inclination of the screen at the end of the effect.
○ Circle (When Direct3D is enabled: slightly slow. When Direct3D is disabled: slightly slow)
The screen is cut out in a circular shape.
If “Start Radius” < “End Radius”, the circle gradually gets larger.
If “Start Radius” > “End Radius”, the circle gradually gets smaller.
The speed at which the circle size changes will be {(“End Radius” - “Start Radius”) ÷ “Execution Time”}.
・Start Radius (dot) … The radius of the circle at the start of the effect.
・End Radius (dot) … The radius of the circle at the end of the effect.
・Circle Roughness (dot) … A higher value makes the circle shape more jagged, but increases execution speed.
○ Scale (When Direct3D is disabled: slightly slow)
If “Start Width” < “End Width”, the screen gradually expands.
If “Start Width” > “End Width”, the screen gradually shrinks.
The speed at which the size changes will be {(“End Width” - “Start Width”) ÷ “Execution Time”}.
・Start Width (dot) … The scaling value of the screen at the start of the effect. “640” is the normal size (same as normal display).
・End Width (dot) … The scaling value of the screen at the end of the effect.
○ Lens (When Direct3D is enabled: too slow. When Direct3D is disabled: too slow)
The entire screen is displayed as if viewed through a lens, centered on the protagonist.
If “Start Distance” < “End Distance”, the screen’s center gradually shrinks (approaches normal display).
If “Start Distance” > “End Distance”, the screen’s center gradually expands.
The speed at which the bulging changes will be {(“End Distance” - “Start Distance”) ÷ “Execution Time”}.
・Start Distance … The distance between the viewpoint and the lens at the start of the effect. “1500” means the lens is flush with the screen, with no change from normal display. The screen’s center bulges most when “0”.
・End Distance … The distance between the viewpoint and the lens at the end of the effect.
・Offset X (dot) … Horizontal offset of the lens application position. If “0”, it’s the center of the protagonist.
・Offset Y (dot) … Vertical offset of the lens application position. If “0”, it’s the center of the protagonist.
○ Mosaic (When Direct3D is enabled: too slow. When Direct3D is disabled: too slow if screen is 16-bit color or higher)
A mosaic effect is applied to the screen.
If “Start Strength” < “End Strength”, the mosaic gradually becomes stronger.
If “Start Strength” > “End Strength”, the mosaic gradually becomes weaker.
The speed at which the mosaic effect changes will be {(“End Strength” - “Start Strength”) ÷ “Execution Time”}.
・Start Strength … The strength of the mosaic at the start of the effect.
・End Strength … The strength of the mosaic at the end of the effect.
Picture
Picture is a feature that displays arbitrary bitmaps.
**Picture bitmap files are located in the “picture” folder within the “bmp” folder.
If you want to add new picture bitmaps, please put them in this folder.
**
**Picture images are loaded immediately after the “Display Picture” command is executed.
Therefore, setting a large image for a picture will slightly increase the load when the “Display Picture” command is executed.
If execution speed is a priority, it might be better to use effects instead of pictures.
**
Database Window “Picture” Tab
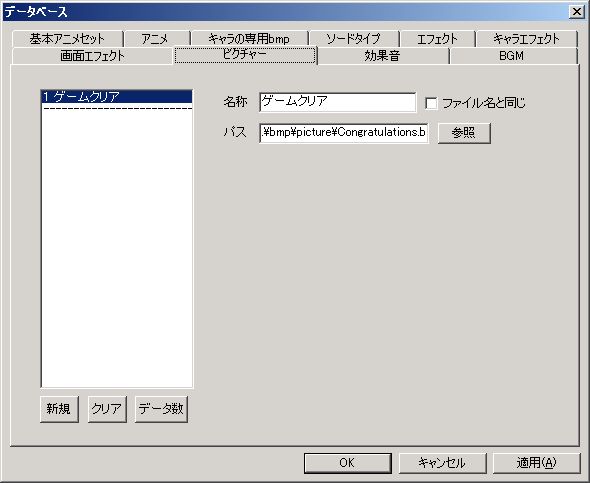
Now, let’s explain each item.
● Name
The name displayed in the editor.
● Path
The path to the bitmap.
Please specify as a relative path.
Sound Effect
Sound effects for use in games.
**All sound effect files are located in the “wave” folder.
If you want to add new sound effect files, please put them in this folder.
**Only Wave (.wav) files are supported.
Only Wave files in uncompressed PCM format with disabled Wave extensible format are supported; other formats (such as ADPCM) will not play in the game even if they can be played in the editor.
Few people normally pay attention to the Wave format, but it’s good to remember that “if it doesn’t play in the game, converting the format will likely solve it.”
This format conversion is perfectly possible with free software; for example, with “Audacity”, a software favored by this software’s author, simply importing the problematic file and re-saving it will effectively convert it to an uncompressed PCM Wave file with disabled Wave extensible format.
Database Window “Sound Effect” Tab
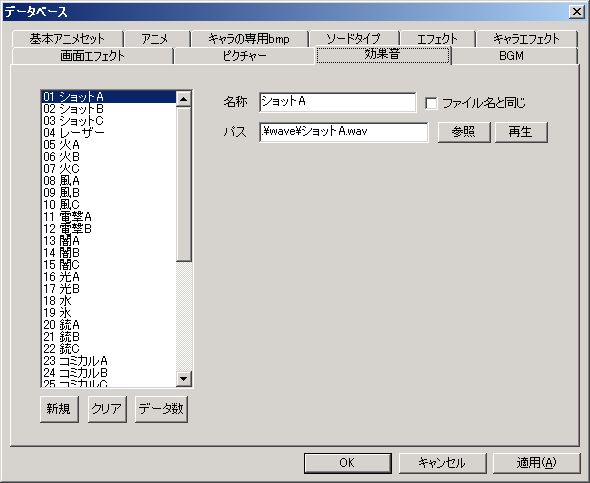
Explanation of each item:
● Name
The name displayed in the editor.
● Path
The path to the sound effect file.
Please specify as a relative path.
Only Wave (.wav) format is supported.
BGM
Music for use in games.
**Music files are located in the “bgm” folder.
If you want to add new music files, please put them in this folder.
****Midi (.mid) and Ogg Vorbis (.ogg) formats are supported.
Different volume settings are applied to Midi and Ogg Vorbis, so it’s better to unify to one format rather than using both Midi and Ogg Vorbis in one game.
**For details on Ogg Vorbis (.ogg), please refer to the following site.
Site Name: Ogg Village
URL: http://oggvorbis.fc2web.com/
Database Window “BGM” Tab
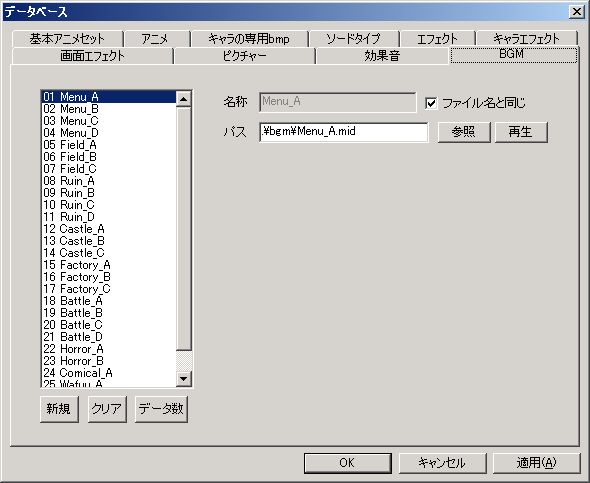
Now, let’s explain each item.
● Name
The name displayed in the editor.
● Path
The path to the music file.
Please specify as a relative path.
Midi (.mid) and Ogg Vorbis (.ogg) formats are supported.
● Volume
Playback volume.
Can be changed within the range of 0% to 100%.
Default is 100%, playing at original volume.
You can lower the volume per song, but you cannot raise it. If you want to raise it, please process the music file itself using free software that can change volume.
World Chip
World chip refers to map chips for the world map.
Database Window “World Chip” Tab
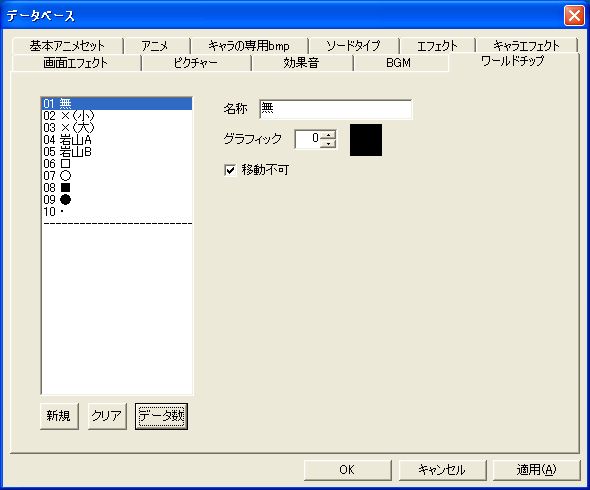
Now, let’s explain each item.
● Name
The name displayed in the editor.
● Graphic
The graphic number.
The world chip image file is “WorldMapChip.bmp” in the “bmp” folder.
● Impassable
If checked, movement becomes impossible.
However, even if the map chip itself is impassable, if pass-through events like stage events are placed, those take precedence, allowing movement.