Character Settings Table of Contents
Explains character parameters.
“1” Tab
Character Data Edit Window “1” Tab
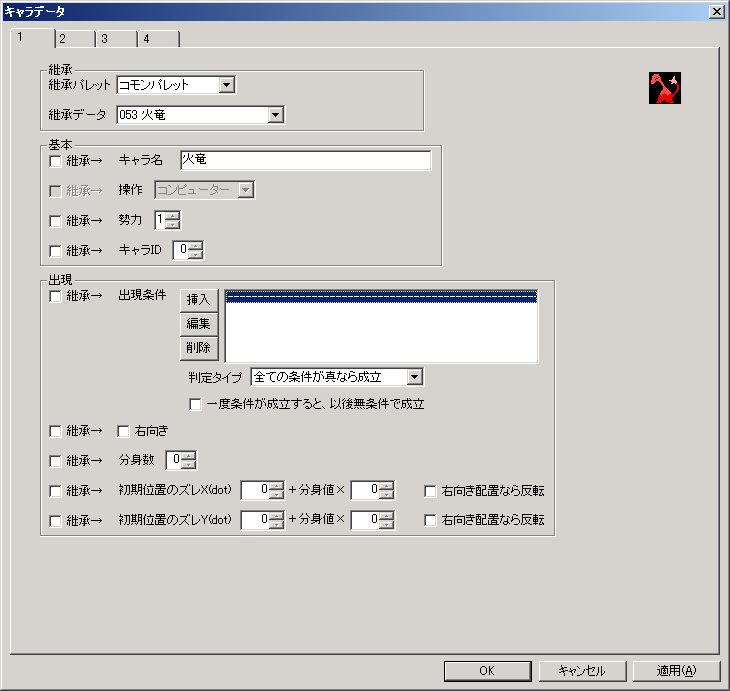
● Inheritance Palette
The palette where the inherited source data for each parameter exists.
Only higher-level palettes can be specified.
● Inherited Data
The inherited source data for each parameter.
● Inherit (Multiple checkboxes on the left of the window)
Whether to inherit settings from the data configured in “Inherited Data.”
One checkbox is provided for each parameter or group of parameters.
● Character Name
The name of the character.
It will not be displayed in the game, but for palette data, the character name is displayed in “Inherited Data” and “Character Summon” commands, etc., so it’s good to name it.
● Control
”Player” or “Computer”.
If “Player” is specified, this character becomes the protagonist, and if this character dies, stage progression also fails.
Note that the “Control” of characters placed on the stage cannot be changed.
● Faction
Faction is information used to distinguish between allies and enemies.
Hit detection is not performed between characters or shots of the same faction. (They will not take damage or impact when they collide.)
● Character ID
Setting a character ID here allows you to specify this character in the “Set Target” command.
● Appearance Condition Enemy Only
Conditions for the character to appear.
○ Appearance Condition List
Multiple conditions can be set.
For details on setting the appearance condition list, refer to “Appearance Condition List / Flow Basic Condition (Execution Condition) List Settings”.
○ Evaluation Type
How the conditions are ultimately evaluated based on the appearance condition list.
”True” here means that the set condition has been met.
○ Once condition is met, it is always met unconditionally thereafter
Self-explanatory.
● Facing Right
Whether the character faces right.
By the way, you can also change the character’s orientation on the stage with mouse right-drag + “R”.
● Number of Clones Enemy Only
The number of enemies.
If “1” or more, multiple enemies will be placed in one square.
Also, each character (clone body) is assigned a clone value according to the “number of clones”.
Clone value refers to “which clone number it is”.
For example, if “Number of Clones” is “2”, a total of 3 entities with clone values of “0”, “1”, and “2” will be placed.
Clone values can be used in the character’s “Initial Position Offset” and movement commands, etc.
● Initial Position Offset X (dot)
● Initial Position Offset Y (dot)
Normally, characters appear in the center of the square where they are placed.
By setting an initial position offset, you can shift the appearance position by any number of dots from the center of the square.
“2” Tab
Character Data Edit Window “2” Tab
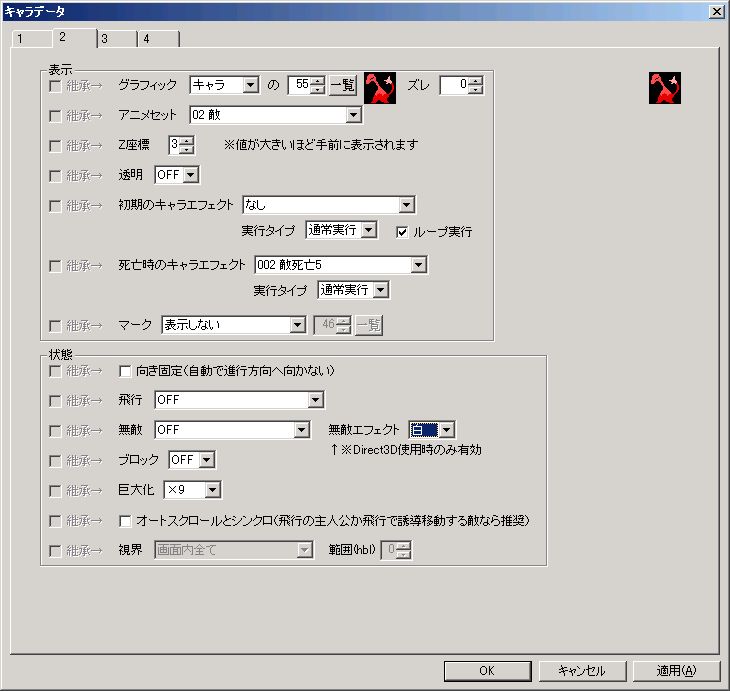
● Inherit (Multiple checkboxes on the left of the window)
Whether to inherit settings from the data configured in “Inherited Data.”
One checkbox is provided for each parameter or group of parameters.
● Graphic
The character’s graphic.
Setting “Offset” allows you to shift the starting frame in the animation.
Specifying block, item, or shot graphics disables animation.
● Animation Set
The character’s basic animation set.
Can be specified from the basic animation sets configured in the database.
● Z-coordinate
The program draws objects in order from the smallest “Z-coordinate”.
In other words, a larger “Z-coordinate” means it will be displayed closer to the foreground.
Note that if multiple objects have the same “Z-coordinate”, their display order is not guaranteed.
● Transparent
Whether to hide the graphic.
● Initial Character Effect
Can be specified from the character effects configured in the database.
○ Execution Type
・“Normal Execution” … Executes the character effect.
・“Reverse Execution” … Executes the character effect in reverse.
・“Loop Execution” … Executes the character effect, then executes it in reverse.
○ Loop Execution
Whether to repeat the character effect execution.
● Death Character Effect
Can be specified from the character effects configured in the database.
○ Execution Type
・“Normal Execution” … Executes the character effect.
・“Reverse Execution” … Executes the character effect in reverse.
・“Loop Execution” … Executes the character effect, then executes it in reverse.
● Mark
Whether to display a mark.
The mark is displayed in front of the character’s graphic.
The mark’s original role (reason for implementation) is to “display only in the editor”, allowing different objects with the same appearance to be distinguished in the editor.
● Fixed Direction (Does not automatically face direction of movement)
Prevents the character’s orientation from changing even when moved by movement commands.
If “Fixed Direction” is disabled, when a character is moved by a movement command, its orientation will face the direction of movement.
Some movement commands may have settings that only function if Fixed Direction is enabled, requiring a bit of getting used to.
● Flight
Flight state.
・“OFF” … Walks without flying. Walking characters are affected by gravity. Also, all vertical movement by movement commands is disabled.
・“ON (passes through blocks)” … Flies. Passes through blocks.
・“ON (collides with blocks)” … Flies. Collides with blocks.
・“ON (instant death on collision with block)” … Flies. Dies instantly on collision with block.
● Invincible
Invincible state.
Takes no damage while invincible.
・“OFF” … Not invincible.
・“ON (shots hit)” … Becomes invincible. Shots hit.
・“ON (shots pass through)” … Becomes invincible. Shots pass through.
“Invincible Effect” is an effect only effective in Direct3D mode, where invincible characters glow with a specified color at regular intervals.
By the way, since glowing in a color close to the character’s graphic might not be noticeable, the default data is all “white”.
● Block Enemy Only
Whether to convert to a block.
Block characters (characters converted to blocks) are immune to body collisions. (Setting damage or impact from body collisions has no effect.)
Also, non-block characters die if crushed between block characters.
Block characters overlap without colliding with each other.
● Scale
How many times to enlarge the character.
● Sync with Auto-scroll (Recommended for flying protagonist or enemies with guided movement)
Whether to always move at the same speed as auto-scroll.
Syncing with auto-scroll allows:
・If the character is the protagonist in flight, it will be easier to move even during auto-scrolling.
・If the character is an enemy in flight with guided movement, the relative speed to the target will be symmetrical. For example, if the horizontal auto-scroll speed is 10, the relative speed to the target will be the same whether moving from left to right or from right to left with guided movement.
● Vision Protagonist Only
The range visible to the player.
”Range (hbl)” can be used to set the width of vision.
“3” Tab
Character Data Edit Window “3” Tab
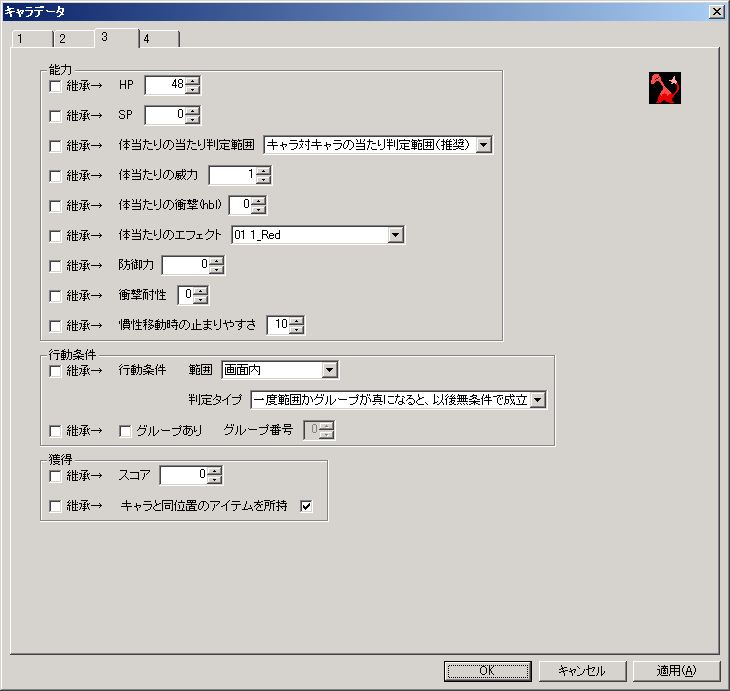
● Inherit (Multiple checkboxes on the left of the window)
Whether to inherit settings from the data configured in “Inherited Data.”
One checkbox is provided for each parameter or group of parameters.
● HP
Character’s health.
If this reaches 0, the character dies.
● SP
A type of variable, but unlike character variables, it is displayed in the status window like HP and has a bar displayed above the character’s head when its value changes.
It is useful for limiting the number of special moves, etc.
● Body Collision Hit Detection Range
The range used for hit detection with characters of different factions.
・“Character vs. Character Hit Detection Range (Recommended)” … Applies the settings of “Character (Protagonist or Enemy) vs. Character” in Main Menu “Stage” > “Stage Settings” > “Advanced Settings 2” tab. Recommended unless there are special circumstances.
・“Character vs. Shot Hit Detection Range” … Applies the settings of “Character (Protagonist or Enemy) vs. Shot” in Main Menu “Stage” > “Stage Settings” > “Advanced Settings 2” tab.
・“Shot vs. Character Hit Detection Range” … Applies the settings of “Shot (Protagonist’s Shot or Enemy’s Shot) vs. Character” in Main Menu “Stage” > “Stage Settings” > “Advanced Settings 2” tab.
・“32x32” … Both width and height are 32 dots, making it easier to hit.
● Body Collision Power
How much damage to deal to an opponent when colliding with a character of a different faction.
Actual Damage = “Body Collision Power” - Opponent’s “Defense”.
If the value is negative, the opponent recovers.
● Body Collision Impact (hbl)
How much to blow away an opponent when colliding with a character of a different faction.
Actual Impact = “Body Collision Impact” - Opponent’s “Impact Resistance”.
The direction of blowback will be the same as your movement direction. (If the value is negative, it will blow in the opposite direction of your movement.)
If you collide when not moving, you cannot blow away the opponent.
● Body Collision Effect
Effect to display when colliding with a character of a different faction.
Can be specified from the effects configured in the database.
● Defense Power
How much to reduce damage received from an opponent when colliding with a character of a different faction.
Damage Taken = Opponent’s “Body Collision Power” - “Defense Power”.
● Impact Resistance
How much to reduce impact received from an opponent when colliding with a character of a different faction.
Impact Taken = Opponent’s “Body Collision Impact” - “Impact Resistance”.
● Ease of Stopping during Inertial Movement
Ease of stopping when the character is moving inertially.
Strictly speaking, it affects the time it takes for the character to actually come to a stop after an inertial movement command (a movement command with inertia enabled) has finished executing.
”Ease of stopping during inertial movement” does not affect the movement speed during the execution of an inertial movement command.
● Action Condition Enemy Only
This and the following group settings determine when an enemy acts. (When to execute a flow; and for walking characters, when to be affected by gravity.)
※For walking characters, if action conditions have been met at least once, they will always act while jumping or falling, even if action conditions are not met. This is a specification to ensure they always die from falling.
○ Range
・“On Screen” … Acts when it enters the screen.
・“X-coordinate Only On Screen” … Acts when its X-coordinate enters the screen. (Acts even if unseen off-screen vertically.)
・“Y-coordinate Only On Screen” … Acts when its Y-coordinate enters the screen. (Acts even if unseen off-screen horizontally.)
・“Full Range” … Always acts.
○ Evaluation Type
How the conditions are ultimately evaluated based on the set range and group.
”True” here means that the set condition has been met, and “False” means that the set condition has not been met.
※However, regardless of this setting, if the character is on screen, the condition will always be met. For example, if “Range” is “On Screen”, “Group Enabled” is ON, “Group Number” is 1, and “Evaluation Type” is “Activate if range and group are false”, the condition is set so that all characters with group number 1 should not act if they are on screen, but in reality, they will act.
● Group Enabled Enemy Only
When a group is set, if even one enemy within the same “Group Number” meets the action conditions, that enemy will also act.
If there are multiple enemies you want to act simultaneously, give them the same “Group Number”.
● Score Enemy Only
Score gained by the player when the enemy dies.
● Possesses Item at Same Position as Character Enemy Only
Whether to possess an item at the same position as the character.
If an enemy possessing an item dies, the player acquires that item.
“4” Tab
Character Data Edit Window “4” Tab
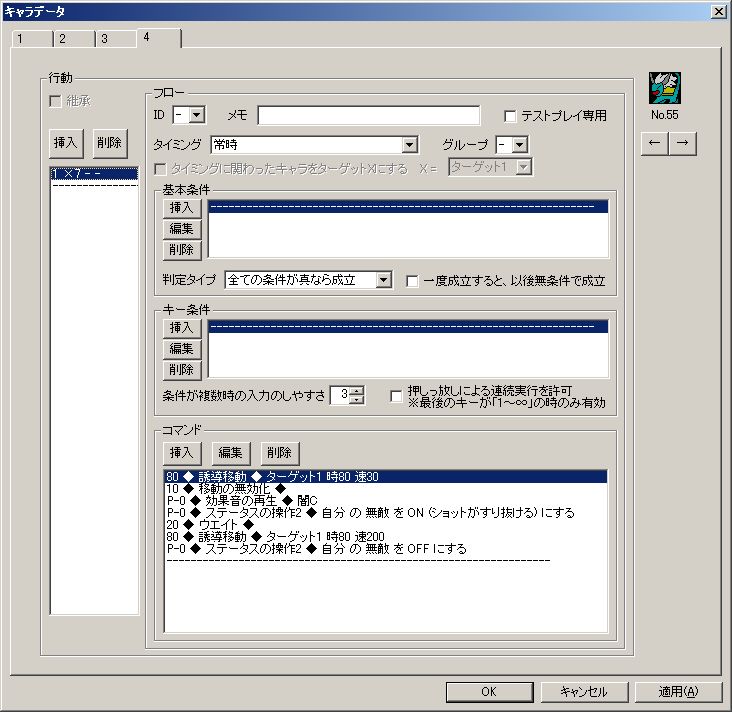
Flow refers to a character’s action information.
● Inheritance
Whether to inherit flow settings from the data configured in “Inherited Data.”
● Flow (Frame)
“ID”, “Timing”, “Group”, “Basic Conditions”, “Key Conditions”, “Commands”, etc., on the right side of the window are collectively referred to as a flow.
Often, only the command part is referred to as a flow. In particular, when “Execute Flow” is mentioned, please understand it as the execution of commands.
(“Commands” refer to the content of a character’s actions, such as movement or shooting.)
The processing flow in a flow is as follows:
**“Timing” occurs
↓
“Group” condition met (If a flow of the same group is executing, it is false)
↓
“Basic Conditions” met
↓
“Key Conditions” met
↓
(If conditions are met) Preparation to execute the flow once (preparation to execute from the beginning to the end of the command list once)
↓
Execute Flow (Commands)!
**
**Once a flow is executed, it will not stop until it finishes the last command, unless the character dies or it’s stopped by a “Flow Operation” command.
**Also, during flow execution, condition evaluation (evaluation of “Timing” to “Key Conditions”) is not performed. (Because a single flow will not execute twice, there’s no need to evaluate conditions).
If multiple flows are set, they will execute in parallel.
**For example, if flows A, B, and C are set, internally (the processing flow in one frame) will execute as follows:
Evaluate Flow A’s conditions (evaluate “Timing” to “Key Conditions”)
↓
(If conditions are met) Prepare to execute Flow A once
↓
Evaluate Flow B’s conditions
↓
(If conditions are met) Prepare to execute Flow B once
↓
Evaluate Flow C’s conditions
↓
(If conditions are met) Prepare to execute Flow C once
↓
Execute Flow A’s (commands)!
↓
Execute Flow B’s (commands)!
↓
Execute Flow C’s (commands)!**
In this way, conditions are evaluated in order from the top of the flow list, and then executed in order from the top of the flow list.
※The following is incorrect ×
Evaluate Flow A’s conditions
↓
(If conditions are met) Prepare to execute Flow A once
↓
Execute Flow A’s (commands)!
↓
Evaluate Flow B’s conditions
↓
(If conditions are met) Prepare to execute Flow B once
↓
Execute Flow B’s (commands)!
↓
Evaluate Flow C’s conditions
↓
(If conditions are met) Prepare to execute Flow C once
↓
Execute Flow C’s (commands)!
This is not how it works.
● ID
Setting an ID here allows you to specify this flow from “Flow Operation” and “Change Flow” commands.
● Memo
You can add memos to flows. Use them when it’s crucial. They do not affect the game.
● Test Play Only
Whether the flow is executed only during test play.
● Timing
At what timing to start the flow.
○ Notes on some timings
・When damage received (set value “Power” is not 0) … This timing occurs when a shot with “Power” not 0 or a character with “Body Collision Power” not 0 hits, regardless of “Defense” or invincibility.
・When damage received (if received damage is 1 or more) … This timing occurs when “Defense” and invincibility are considered, and actually received damage is 1 or more.
・When impact received (set value “Impact” is not 0) … This timing occurs when a shot with “Impact” not 0 or a character with “Body Collision Impact” not 0 hits, regardless of “Impact Resistance”.
・When impact received (if received impact is 1 or more or -1 or less) … This timing occurs when “Impact Resistance” is considered, and actually received impact is 1 or more or -1 or less.
・When died … Only parallel commands (P-0) with execution time 0 can be executed. By the way, the “Stage Clear” command can be executed even when the protagonist “dies”.
・When block hits my ○○ … “Block” here does not include block characters. The flow will not start even if a block character hits.
・Before stage start … Only parallel execution commands (P-*) other than movement/action types can be executed.
● Group
Grouping flows prevents flows within the same group from executing simultaneously.
If there are flows you don’t want to execute at the same time, consider grouping them.
Groups can only be set for flows with “Timing” set to “Always”.
For example, if set as follows, sword and shot will no longer execute simultaneously.
Internally (the processing flow in one frame), conditions are evaluated in order from the top of the flow list. So, for example, if there are multiple flows in the same group whose execution conditions are met, only the flow set higher will be executed.
This property can be used to create simple conditional branches.
While you can achieve similar results (to using groups) by using variables or setting many basic conditions, using groups results in slightly faster execution speed.
※If multiple flows in the same group have the same key condition and “Allow continuous execution by holding down” is disabled, flows other than the topmost flow may execute regardless of “Basic Conditions”. This is because, to avoid “continuous execution by holding down a key”, the program disables key condition activation once it activates until the key condition becomes false. During this disabled state of key condition activation, another flow (other than the topmost flow in the same group) may execute.
Here’s an example:
The above is the setting for a shot that consumes 1 SP, also configured for the default protagonist. Assume Flow A and Flow B have exactly the same key conditions.
If the user’s SP is 0 during the game and the C key is pressed, it might seem like only Flow A should execute since Flow A and Flow B are in the same group, but actually, if the C key is mashed, Flow B might execute instead of Flow A for the reason mentioned earlier. It’s problematic if a shot can be fired even when SP is 0.
If you want to resolve this issue, please set the condition properly for Flow B as shown below:
[Flow A] Group: a Basic Condition: SP 0 or less Key Condition: “C” pressed Command: Play Sound Effect (Error Sound)
[Flow B] Group: a Basic Condition: SP 1 or more Key Condition: “C” pressed Command: Shot, Status Manipulation (My SP -1)
By the way, even with the default data, versions before 7.78β were released with the first example’s settings without realizing this problem… As a result, shots could be fired repeatedly with the C key even when SP was insufficient. Though some versions might not have this issue.
● Target X character involved in timing
Sets the character involved in the timing activation as the target (1-4).
Specifically, it works as follows:
If timing is “When damage received” or “When impact received” … If damage or impact is received by hitting a character, and the hitting opponent is not an attack, that character becomes the target. However, if the hitting opponent is an attack (a character summoned with attack enabled), that character’s parent character becomes the target. If damage or impact is received by hitting a shot, the character who fired that shot becomes the target.
If timing is “When hit by character” … If the hitting opponent is not an attack, that character becomes the target. If the hitting opponent is an attack (a character summoned with attack enabled), that character’s parent character becomes the target.
If timing is “When hit by shot” … The character who fired that shot becomes the target.
If timing is “When ridden by protagonist” or “When ridden by character” … The riding character becomes the target.
If timing is “When damage dealt by attack”, “When impact dealt by attack”, or “When attack hits” … The character hit by the attack becomes the target.
Note that “When died,” “When hit by block character,” “When riding block character,” etc., are not supported even though they seem like they should be.
**The target is changed immediately before the basic conditions and key conditions of the flow are evaluated.
Therefore, the changed target applies to the “Target” that can be specified in the basic conditions.
**However, if the basic conditions or key conditions are not met, the target reverts to the previous target.
● Basic Conditions (Frame)
Flow execution conditions.
○ Condition List
Multiple conditions can be set.
For details on setting the basic condition list, refer to “Appearance Condition List / Flow Basic Condition (Execution Condition) List Settings”.
○ Evaluation Type
How the conditions are ultimately evaluated based on the basic condition list.
”True” here means that the set condition has been met.
○ Once met, always met unconditionally thereafter
Self-explanatory.
● Key Conditions (Frame)
Flow execution conditions related to key input.
When multiple conditions are set, they are checked in order from the top of the list.
※If conditions involving consecutive identical keys, such as Z・Z・Z (Z key 3 times), are used, they may be slightly harder to activate. In such cases, consider setting “Ease of input for multiple conditions” higher or inserting “Action Key Neutral” between the keys. However, if “Apply behavior from versions 6.68 and earlier for key condition evaluation (if conditions involve consecutive identical keys, they activate with fewer key presses or are otherwise easier to activate than intended)” is enabled in the system settings, then consecutive identical key conditions are easier to activate, and this exception does not apply.
○ Key Condition Settings (Key Condition Window)
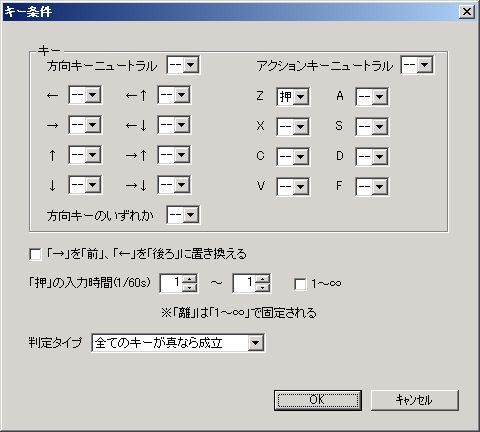
・Key … For each key, you can set “Pressed” or “Released”. “Neutral” means no key is pressed. For example, if “Direction Key Neutral” is set to “Pressed”, the condition is met when no directional key is pressed.
・Replace ”→” with “Front”, ”←” with “Back” … Self-explanatory. Can be used for fighting games with fixed character direction.
・“Pressed” Input Time (1/60s) … Input time for the key set to “Pressed”.
・Evaluation Type … Evaluation method for the overall key condition.
○ Ease of input for multiple conditions
Strictly speaking, “how many previous frames to capture input from.”
A higher value makes input easier, but also increases the possibility of the condition being met (command activating) when the player doesn’t intend to.
For example, for complex conditions like “1 rotation of directional keys” → “Z”, if it’s actually hard to succeed input, consider increasing this value.
○ Allow continuous execution by holding down
Whether the flow executes continuously when the last key in the key condition is held down.
*The input time for the last key must be “1~∞”.
● Commands (Frame)
Content of actions.
When multiple commands are set, they are executed in order from the top of the list.
In the command list below the window, each command’s “Execution Time,” “Command Name,” and “Simple Description” are displayed from left to right.
There are two types of commands: serial execution type and parallel execution type.
Serial execution type commands wait for the command to finish before executing subsequent commands below it.
Parallel execution type commands execute the next (immediately below) command without waiting for the current command to finish.
Most movement and action commands are serial execution by default, but can be made parallel execution by checking the “Parallel Execution” option.
In the command list below the window, parallel execution commands are noted with “P-” (e.g., “P-1”) before their execution time.
When the last command finishes, the entire flow also finishes.
”Last command” refers to the bottommost command in the command list.
Even if the last command is a parallel execution command, the program waits for that command to finish before terminating the flow.
If there are still parallel execution commands in progress when the last command finishes, those commands will also terminate.
However, for performance-related commands like “Message,” “Execute Effect,” “Execute Character Effect,” “Execute Screen Effect,” “Display Picture,” and “Change Screen Color,” the performance continues even if the flow ends.
This is because these performance elements are processed separately from the flow.
Performance time is expressed as a number in parentheses, like “P-0(3)”. (This display format has been adopted since version 7.08)
Only the “Execute Animation” command is an exception; despite being a “P-0(*)” type with execution time 0, it synchronizes with the flow’s behavior.
For example, if the flow ends, the animation also ends.
However, the “Flow Operation” command’s ability to resume animation from pause was only implemented in version 9.04.